Have you ever admired a flawless human hair wig and wondered exactly what makes it look so incredibly real at the scalp? The secret rarely lies in the length or the wave pattern—it lives in the first two inches of hair. A perfectly executed “rooted” effect, featuring a subtle, beautifully blended shadow at the base, mimics the way natural bio hair grows. It provides depth, diffuses harsh lines, and transforms a great wig into an undetectable one.
However, achieving this salon-quality aesthetic isn’t as simple as brushing dark dye over light roots. It requires an understanding of how light reflects off a multi-tonal base to create the illusion of a genuine scalp. Beginners often struggle because they apply a single flat color rather than a graduated “smudge,” resulting in a harsh, unnatural line. You can find deeper technical details and foundational techniques in our comprehensive guide on mastering wig coloration & highlighting (human hair wigs only). Today, we are going to bridge the gap between amateur experimentation and professional customization, teaching you how to permanently and safely root your human hair pieces.
The Anatomy of a Natural Root: Moving Beyond Temporary Hacks
While temporary root sprays, powders, and markers offer quick fixes, they can run in the rain, rub off on your forehead, or leave a sticky residue. Permanent customization using salon-quality methods gives you freedom and confidence.
Before mixing any color, it helps to understand the “Transition Zone.” On a natural head of hair, the roots are rarely a single solid block of color. They fade gracefully into the mid-lengths. There are three primary ways professionals create this zone:
- Tapping: Applying color strictly to the very first millimeter of the hair (the root) to hide knots without darkening the overall style.
- Smudging: Applying color 1-2 inches down the hair shaft and physically “smudging” it with a brush or fingers to create a seamless, blurred line.
- Shadowing: Bringing the darker color further down (sometimes 3-4 inches) to create significant depth and a more “lived-in” aesthetic.
The Developer Myth
A common misconception in at-home wig coloring is that a higher developer volume yields a better result. When creating a root shadow, the opposite is true. Because you are strictly depositing color (going darker), you should exclusively use a 10-volume or even a 6-volume developer. Higher volumes will needlessly open the hair cuticle, leading to damage, color bleeding, and shortened wig lifespan.
Preparing for Perfection: Porosity and The Golden Rule
Human hair wigs have already undergone significant processing to achieve their beautiful textures and colors. This alters the hair’s “porosity”—its ability to absorb and hold moisture and color.
The 10-Second Porosity Test
Before you begin, spray a section of your wig with water. If the water beads up and rolls off, the hair has low porosity. If it absorbs the water instantly (within 10 seconds), it has high porosity. Highly processed wig hair is almost always highly porous, meaning it will absorb hair dye up to twice as fast as natural bio hair. Knowing this prevents the dreaded “hot roots” or accidentally turning your wig much darker than intended.
The Golden Rule of Formulation
If you are adding dark roots to a blonde wig, you must respect the chemistry of color. If you apply a cool, ash-brown dye directly over a platinum blonde wig, your roots will turn muddy, gray, or distinctly green. Why? Because blonde hair lacks the underlying red and orange pigments that give brown hair its richness.
The Fix: Always use a demi-permanent color with a “Gold” or “Warm” base, or add a warm additive to your formula. This warmth “fills” the blonde, ensuring your brown root looks rich and natural.
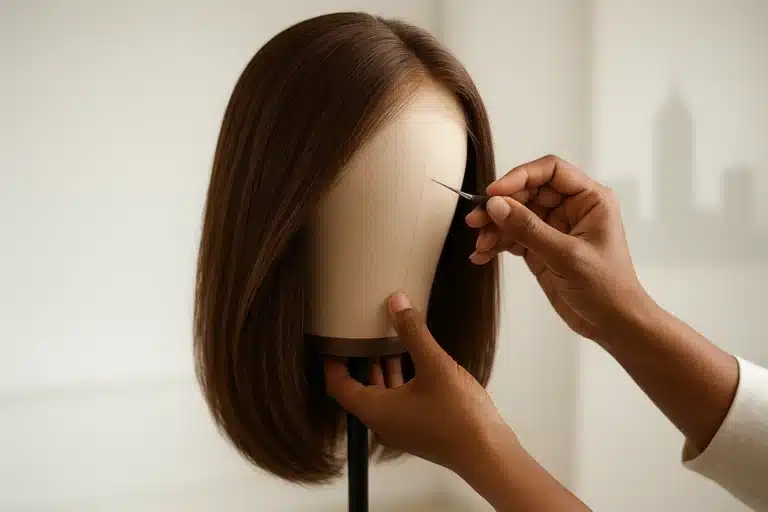
The “Lace-Safety Protocol”: Your Step-by-Step Guide
The number one fear of customizing a wig is staining the delicate lace base. Once dye seeps into the lace or the knots, it shatters the illusion of a natural scalp. By following this strict Lace-Safety Protocol, you can color with confidence.
Phase 1: The Barrier
Most tutorials mention applying petroleum jelly to the lace, but this can be incredibly difficult to wash out and can leave your wig looking greasy. Instead, use the “Got2B Method.” Spray a heavy-duty styling gel spray (like Got2B Glued) generously onto the underside of the lace. Use a blow dryer on the cool setting to freeze it into a solid, clear, protective shield. This creates a mechanical barrier against dye seepage and washes out effortlessly with warm water later.
Phase 2: Sectioning
Work meticulously. Divide the hair into four quadrants, using clips to keep the hair taut. Pay special attention to the part line, the crown, and the delicate “ear tabs.” The hair around the face should ideally have a lighter, softer root than the crown to mimic natural sun exposure.
Phase 3: The Application
Using a professional tint brush, apply your demi-permanent color. Paint the color on vertically rather than horizontally. A horizontal stripe creates a harsh band of color, whereas turning your brush vertically creates a feathered, diffused edge.
Phase 4: The Rinse (The Backwards Tilt)
This is where many flawless root jobs are ruined. If you wash the dye straight down through the blonde ends, the dark water will stain the rest of the wig. Instead, hold the wig upside down by the nape, tilt it backward, and use high-pressure cold water to blast the dye away from the lace and the ends. Cold water is critical here. It physics dictates that cold water keeps the hair cuticle tightly closed, preventing the dark dye from “slipping” into the blonde strands as it washes past them.
The “Wig Color Rescue” Manual
Even the most careful customizers occasionally experience a slip-up. Here is how to handle the most common errors without panic.
- Accidental Lace Staining: If a drop of dye slips past your barrier and hits the lace, don’t scrub it. Mix a small paste of baking soda and 3% hydrogen peroxide. Gently tap this paste onto the stained lace knot with a toothbrush and let it sit for 10-15 minutes before rinsing. It acts as a gentle, targeted lifter.
- The Roots Got Too Dark: If high porosity caused the hair to absorb the dye too rapidly, wash the root area immediately with a clarifying shampoo mixed with a dash of dish soap. This will gently strip the freshly deposited demi-permanent color without damaging the lace.
Frequently Asked Questions (FAQ)
Can I use box dye from the drugstore to root my wig?
It is highly discouraged. Box dyes typically contain ammonia and 20-volume or 30-volume developers, which are unnecessarily harsh for depositing color. They are also notoriously unpredictable on processed wig hair. Always opt for a professional demi-permanent gloss or cream.
What is the difference between demi-permanent and semi-permanent?
Semi-permanent color (like fashion colors or direct dyes) sits on the outside of the hair shaft and washes out quickly. Demi-permanent color uses a low-volume developer to gently open the cuticle and deposit color just beneath the surface, lasting much longer (usually 20-25 washes) while fading beautifully on a wig.
Do I need to color the roots of my wig while it’s on a mannequin head?
Yes, absolutely. Using a canvas block head allows you to pin the wig securely (pinning through the tracks, never the lace) so you can maintain tension. Tension allows for precise application and prevents dye from accidentally flicking onto the lengths of the hair.
How do I maintain my rooted wig after coloring?
Wash your wig only when necessary using sulfate-free, color-safe shampoos. Always use cold or lukewarm water to prevent the dark root color from bleeding into the lighter ends over time.
Continuing Your Wig Customization Journey
Understanding the chemistry, mechanics, and techniques behind natural rooted effects empowers you to take control of your hair journey. A rooted wig does more than just look stylish; it provides the wearer with a profound sense of security and realism.
As you continue to explore the world of alternative hair, remember that customization is both an art and a science. Whether you are dealing with hair loss and seeking the most natural look possible, or simply exploring a new aesthetic, mastering these foundational concepts is your first step toward true hair confidence. Take your time, respect the integrity of the hair, and embrace the beautiful, highly-personalized results that follow.