Have you ever spent time perfectly positioning your wig, only to feel it slowly creeping up the back of your neck just an hour later? Or perhaps you’ve experienced that unmistakable, headache-inducing pinch where the ear tabs dig sharply into your temples? If standard wig sizes always seem to fit you a little awkwardly, take a deep breath. You aren’t doing anything wrong, and there is absolutely nothing wrong with your head.
The frustrating truth is that the wig industry’s standard two-dimensional measurement system—which often relies solely on head circumference—simply fails the roughly 15% of people with non-standard cranial contours. To overcome these mechanical challenges, mastering wig fit through precise head measurements and cap sizing is your foundational first step. By shifting our approach from basic sizing to anatomical mapping, we can finally transform your wig from something you just tolerate into something you love wearing.
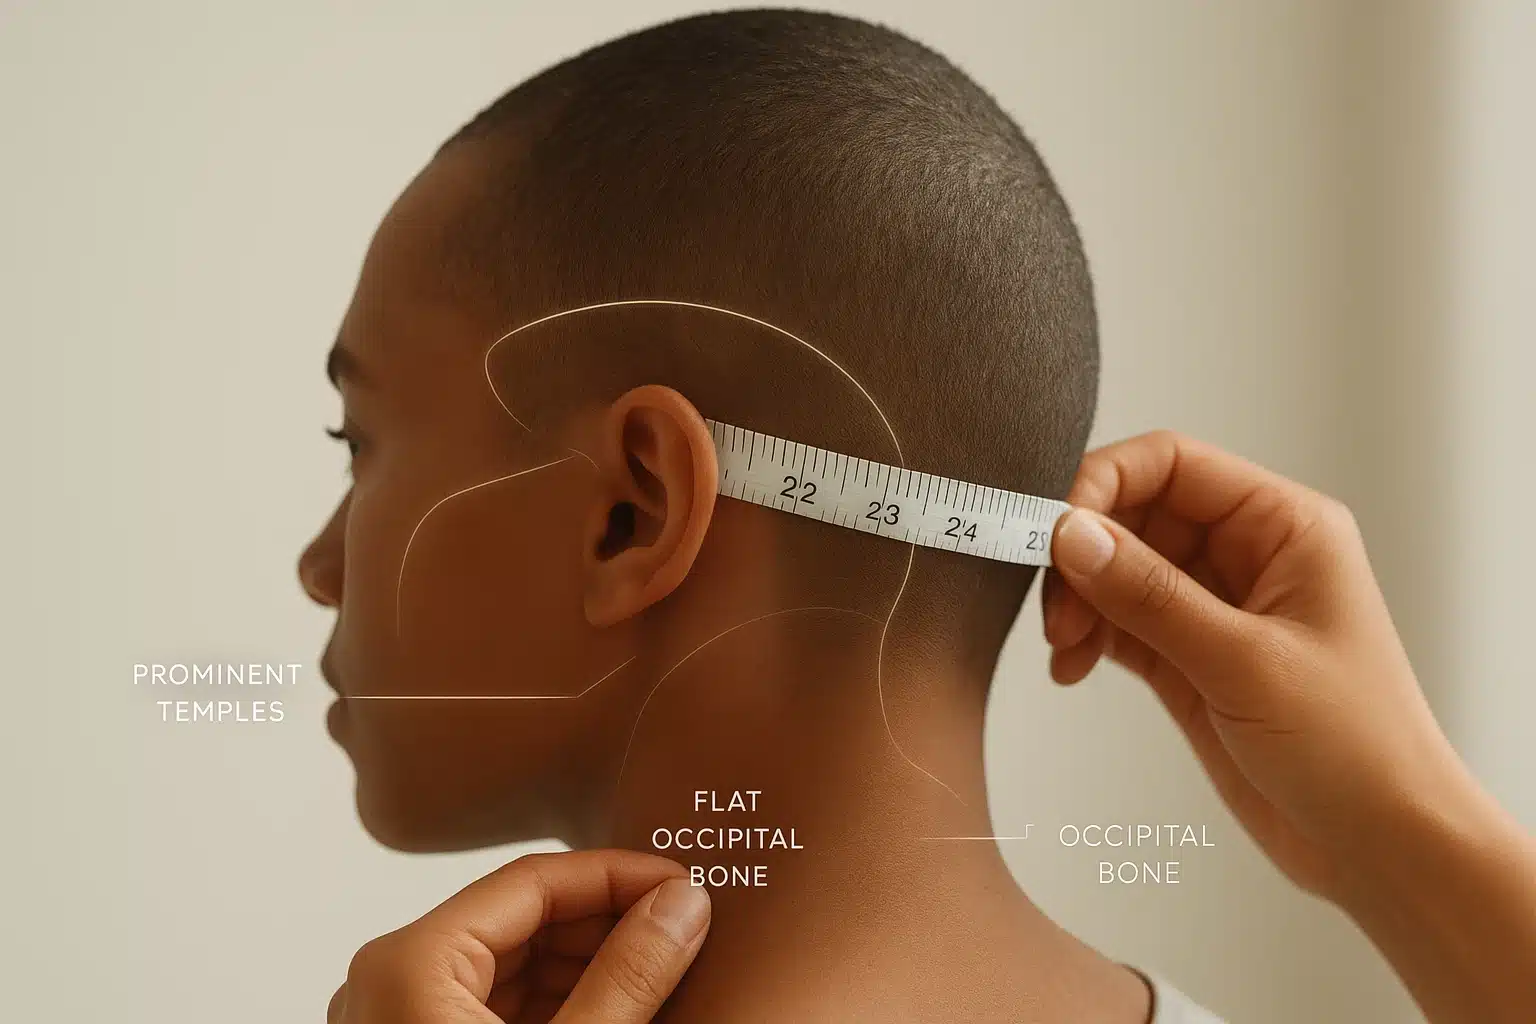
The “Occipital Shelf” and Why Standard Sizing Fails
When you look closely at how a wig is constructed, its security relies heavily on basic physics. Most standard wig caps are designed to anchor themselves against the natural protrusions of the human skull.
The most important of these protrusions is the occipital bone—the curved bone at the lower back of your skull. In wig fitting, we like to call this the “occipital shelf.” For a wig to stay perfectly in place, the elastic at the nape of the cap needs to tuck gently under this shelf, acting like a hook.
But what if you don’t have a pronounced shelf? Morphological studies indicate that up to 12% of the population experiences some degree of occipital flatness (a trait known scientifically as brachycephaly). If the back of your head is flat, it functions more like a slide than a hook. Without that shelf to anchor against, normal neck movements will cause the wig to gradually ride up.
Similarly, if you have prominent temporal peaks (the bones just above and slightly forward of your ears), standard ear tabs will bow outward or press uncomfortably into your skin, creating painful temple pressure.
The Slide Test: Discovering Your Unique Contours
Before you pick up a measuring tape, you need to understand your canvas. You can easily map your own head using “The Slide Test.”
Place your hand flat against the back of your crown and slowly slide it straight down toward your neck.
- The Hook: If your hand hits a distinct inward curve before reaching your neck, you have a prominent occipital shelf.
- The Slide: If your hand travels down in a relatively straight, flat line to your neck, you have a flat occipital bone.
Next, place your hands flat against your temples. If you feel a distinct outward bowing compared to the width of your cheekbones, you have prominent temporal peaks. Knowing these two factors changes everything about how you measure.
The 6-Point Anatomical Measurement Protocol
Most basic guides will ask for three measurements. But if you have a unique head shape, you need the 6-Point Anatomy Check to get a truly secure fit.
A quick pro-tip before you begin: If you are experiencing partial hair loss, do not pull the tape measure tightly over new growth or those weird curly hairs on my head that sometimes sprout during the regrowth phase. Measuring over uneven patches of hair can skew your measurements by up to 0.5 inches. Keep your hair as flat and smooth as possible.
1. Circumference
Wrap the tape measure around your hairline, dropping it slightly behind your ears and around the nape of your neck.
2. Front-to-Nape
Measure from your natural front hairline straight back over the crown to where your hairline ends at the nape.
3. Ear-to-Ear (Over the Crown)
Measure from the top of one ear, directly over the top of your head, to the top of the other ear.
4. Temple-to-Temple (Across the Front)
Measure from the temple on one side across your forehead to the temple on the other side.
5. Nape Width
Measure the width of your hairline at the very back of your neck.
6. The Missing Link: Temple-to-Temple (Around the Back)
This is the measurement most guides skip! Measure from one temple, around the back of your head (where the occipital bone is), to the other temple. If you have a flat back of the head or prominent temples, this number will tell you exactly how much “give” you need in the wefting of the wig cap.
The Measurement Offset Guide
Once you have your measurements, you might realize they don’t perfectly align with a standard “Average” or “Petite” size chart. Here is how to adjust your thinking:
- If you have a flat back (The Slide): Your Front-to-Nape measurement might read as “Average,” but because you lack the occipital curve, an Average cap will likely bag in the back and ride up. You will often benefit from looking at “Petite-Average” caps, or intentionally sizing down your Front-to-Nape measurement by a quarter inch to ensure the nape elastic has enough tension to grip flat skin.
- If you have prominent temples: You may measure as a “Petite” in circumference, but require an “Average” for your Temple-to-Temple measurements. In this case, always fit your largest measurement (the temples) to avoid headaches, and rely on cap modifications to tighten the rest.
The “Fix-It” Toolkit: Securing Your Fit
Understanding your measurements is half the battle; the other half is utilizing the right tools to bridge the gap between a standard cap and your unique anatomy.
- Velvet Wig Grips: For those with a flat occipital bone, a velvet wig band is your best friend. The directional pile of the velvet creates an artificial “shelf” and provides immense friction, stopping the dreaded backward slide.
- Silicone Grips: If you have complete hair loss, a medical-grade silicone band works wonderfully with body heat to create a secure, slip-free perimeter without adding bulk to prominent temples.
- Scalp Prep: Don’t underestimate the power of a healthy scalp. Using a high-quality bald head polish can hydrate the skin while leaving a perfectly primed, slightly tacky surface that helps silicone grips and wig caps stay put.
- The Criss-Cross Strap Hack: If your wig has adjustable velcro or bra-strap adjusters at the nape, don’t just pull them straight across. Criss-crossing them forms a tighter “X” shape at the nape, artificially creating a hugging sensation that mimics the grip of an occipital bone.
Frequently Asked Questions About Wig Fitting
Why does my wig slide up in the back?
This is almost always due to a flat occipital bone. Without a natural curve at the back of the skull for the wig to hook under, the movement of your neck pushes the cap upward. Using a velvet wig grip and crossing the nape adjusters into an “X” shape can solve this.
Why are the ear tabs digging into my temples?
This usually means your temporal peaks are wider than the standard cap allowance, or your wig’s ear-to-ear measurement is too small. Sizing up and tightening the back, or carefully bending the metal stays inside the ear tabs slightly outward, can relieve this pressure.
How do I measure if I have partial hair loss?
Consistency is key. Flatten your existing hair as much as possible using a wig cap or styling gel. Avoid measuring directly over localized areas of thick new growth, as this will artificially inflate your measurements and result in a baggy wig cap.
Your Next Steps Toward the Perfect Fit
Navigating hair loss or alternative hair is a deeply personal journey, and finding a wig that feels like a natural extension of yourself shouldn’t require a degree in engineering. By understanding your unique cranial anatomy and taking these six precise measurements, you are taking the guesswork out of the process.
You deserve a wig that allows you to move freely, confidently, and comfortably throughout your day. Keep your 6-point measurement handy as you explore different cap constructions, and remember that with the right knowledge, the perfect fit is entirely within your reach.