How Do You Put Hair Extensions In? Quick and Easy Guide
Are you looking to transform your hair and add some extra length or volume? Hair extensions might be the perfect solution for you. They come in a variety of types and can be tailored to blend seamlessly with your natural hair. In this article, we’ll guide you through the process of putting in hair extensions, so you can achieve the look you’ve been dreaming of.
So, if you’re looking to answer the question, how do you put hair extensions in, we’ve got you covered!
Let’s dig in so you can be on your way to rocking your new, fabulous hair!
Types of Hair Extensions
Clip-In Extensions
Clip-in extensions are a great option when you want to add length and volume to your hair quickly. They come in a variety of lengths and colors and are easy to apply. Simply section your hair, attach the clips to your natural hair, and snap them closed. You can easily remove them at the end of the day.
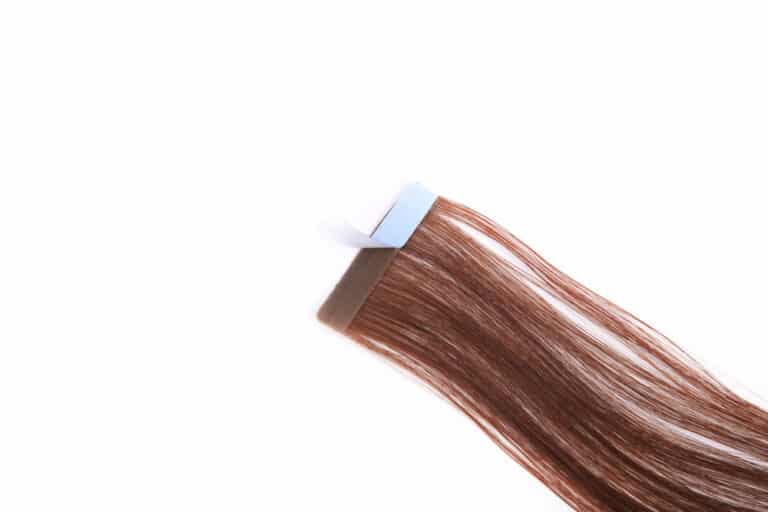
Tape-In Extensions
For a more semi-permanent option, tape-in extensions are an excellent choice. These require a professional touch for proper application. Your stylist will sandwich a thin section of your hair between two wefts of extensions, secured with adhesive tape. They can last up to 6-8 weeks with proper care and can be reused after being retaped.
Sew-In Extensions
Sew-ins, also known as weave extensions or Brazilian knots, are ideal for those with thick, coarse hair. Your hair will be braided into a cornrow, and the extensions will be sewn in using a needle and thread. This method can be time-consuming but provides a longer-lasting and natural-looking result.
Microlinks
Microlink extensions involve attaching small wefts to your hair using tiny metal rings. Your stylist will thread your natural hair through the ring, add the extension, and then clamp it in place. No glue or heat is involved, making it a gentle option for your hair. Adjustment is needed every 4-6 weeks.
Keratin Extensions
For a long-lasting and seamless extension choice, consider keratin extensions. This method involves pre-bonded hair strands with a keratin adhesive tip. Your stylist will apply them to your natural hair using a heat tool to melt the keratin and create a bond. They can last up to 4-6 months.
Synthetic and Human Hair Extensions
You can choose between synthetic and human hair for your extensions. Synthetic hair is made of artificial fibers, is more affordable, and requires less maintenance. However, it can’t be styled with heat tools and doesn’t last as long.
On the other hand, human hair extensions can be styled, washed, and treated like your own hair. They come from various sources, like Brazilian or Indian hair, and provide a more natural look and feel.
By considering these different types of hair extensions, you can find the best method and material to suit your needs and preferences.
How Do You Put Hair Extensions In?
Clip-In Extensions Installation
To install clip-in hair extensions:
- Start by sectioning your natural hair.
- Make a parting from ear to ear at the nape of your neck.
- Clip the top section of your hair out of the way.
- Take your clip-in extensions and open the clips.
- Attach the extensions to the parted section, ensuring they securely snap into place.
- Release the clipped natural hair and create another section about an inch above the installed clip-ins.
- Continue adding clip-ins, following the same pattern until you reach the crown of your head.
Tape-In Extensions Installation
To install tape-in extensions:
- Start by parting your hair down the middle.
- Begin at the nape of your neck, taking a thin section and placing a tape-in extension underneath it.
- Press the adhesive side against your scalp.
- Grab another tape-in extension and stick it to the first one, sandwiching your natural hair between them.
- Continue this process on both sides of your head, making sure to leave space between the tape-ins so they can move freely.
Sew-In Extensions Installation
For sew-in extensions, begin by braiding your natural hair into cornrows. Start at the front hairline and work your way across your head, finishing at the nape of your neck.
Once your hair is braided, sew the ends of the braids together for a secure base. Next, take a weft of hair and sew it onto the braids using a curved needle and thread, starting at the nape and working your way up.
Be sure to sew the wefts close but not too tight to avoid tension on your natural hair.
Microlinks Installation
To install microlink extensions:
- Start by creating sections in your hair.
- Take a small piece of your natural hair and thread it through the microlink bead.
- Slide the bead up to the base of your hair and insert the tip of the extension into the bead.
- Using pliers, clamp the bead shut, securing the extension.
Repeat the process all around your head, paying close attention to spacing and weight distribution.
Keratin Extensions Installation
To install keratin extensions, section your hair and isolate a small piece of natural hair similar in width to the extension. Place a keratin bond connector (heat clamp) near the base of your hair and apply heat to melt the pre-applied keratin on the extension.
As the keratin softens, roll it between your fingers to seal it around your natural hair. Work in rows, starting at the nape and moving upwards, until all extensions are installed.
Blending and Styling Extensions
To achieve a natural look with your hair extensions, it’s essential to blend them seamlessly with your own hair. Start by selecting the right color extensions that match your natural hair. If necessary, have a professional hairdresser dye the extensions to perfectly match your hair color.
Before you begin styling, brush your hair and extensions thoroughly to avoid tangles. Use a wide-tooth comb or a special extension brush for the best results. This will ensure that your natural hair and the extensions are smoothly integrated.
When styling your extensions, feel free to use your regular tools, such as a curling iron, flat iron, or even a hidden crown for added volume.
Just be cautious with the heat setting, as too much heat can damage both your hair and the extensions. Opt for a low-to-medium heat setting, and use a heat protectant spray to prevent damage.
As you style your hair and extensions, focus on creating a cohesive look. For instance, if you’re curling your hair, make sure to curl the extensions as well.
Similarly, if you’re straightening your hair, don’t forget to run the flat iron through the extensions too. This will help to blend the extensions more naturally.
Finally, experiment with different hairstyles that work best with your extensions. Some popular options include half-up/half-down styles, braids, or even a high ponytail. These styles can help conceal the extensions’ wefts and provide a more seamless appearance. Now you’re all set to rock your gorgeous locks!
Maintenance and Care
Taking care of your hair extensions is essential for ensuring their longevity and keeping them looking fabulous. In this section, we will discuss how to properly maintain and care for your hair extensions.
First things first: washing your hair extensions. Make sure to use a gentle sulfate-free shampoo designed for extensions. Doing so will help keep them looking and feeling their best.
Wash your extensions every week or two, depending on your lifestyle and the level of buildup. Make sure not to over-wash as it can cause them to become dry and brittle.
When you’re not washing your hair, keeping your extensions moisturized is essential. To do this, use a leave-in conditioner that’s suitable for extensions. Apply it to your hair and gently comb through to ensure even distribution. This will help keep your extensions soft, manageable, and less prone to tangles.
Another key aspect of hair extension maintenance is properly caring for the area where the extensions attach to your natural hair. Be careful when brushing this area to avoid putting any unnecessary tension on the extension bonds.
Use a soft-bristle brush or a wide-tooth comb to gently detangle your hair, starting at the ends and working your way up to the roots.
Here are a few more tips for maintaining your extensions:
- Keep your hair in a protective style, like a loose braid, when sleeping or participating in activities that may cause tangling.
- Avoid using heat tools on your extensions as much as possible, as the heat can cause damage.
- Be mindful of the styling products you’re using. Stick to lightweight, non-greasy products made specifically for extensions.
- Schedule regular appointments with a professional to check the bonds and ensure they remain secure and in good condition.
Following these essential maintenance and care tips, you can keep your hair extensions looking fabulous and extend their lifespan.
Extensions Costs
When considering hair extensions, you might be curious about the costs. The price of extensions can vary a lot depending on the type, quality, and method of installation. Here is a brief overview of what to expect:
- Clip-in extensions: These are the most affordable and easiest to install. You can expect to pay between $50 and $200 for a set.
- Tape-in extensions: These are semi-permanent and usually cost between $200 and $500.
- Fusion or Keratin bonded extensions: These are the most expensive and longest-lasting option, with costs ranging from $500 to $2,000.
Extensions Pros and Cons
When it comes to versatility, hair extensions offer a wide range of options. You can achieve various looks by choosing different lengths, colors, and textures. Some of the pros of using extensions include:
- Instant length and volume: Extensions can help you achieve your desired hair length and thickness within minutes.
- Low commitment: Except for keratin-bonded extensions, most extensions allow you to experiment with different styles without making a long-term commitment.
- Color variation: Extensions can help you add highlights or lowlights without the need for chemicals or dyes.
However, there are some cons to be aware of:
- Maintenance: Some extensions need regular care and maintenance, and you might need to change your styling routine to maximize their lifespan.
- Cost: Depending on the type of extension and installation method, the cost can add up and might not be suitable for everyone’s budget.
- Potential hair damage: If not applied and removed properly, some extension methods can cause damage to your natural hair.
To sum up, extensions can provide great versatility and a range of options to enhance your look. Just be sure to factor in the costs, pros, and cons when deciding.
Choosing the Right Hair Extensions For You
When selecting hair extensions, consider the length, volume, texture, type of hair, real or synthetic, and color that best suit your needs.
First, think about the length and volume you desire. If you’re aiming for a dramatic change, opt for extensions that are significantly longer than your natural hair. For more subtle adjustments, choose extensions that are only a few inches longer. To add volume, find extensions with a thickness that matches your hair’s natural density.
Next, consider the texture of the extensions. Make sure they match your natural hair so the extensions blend seamlessly. Take note of whether your hair is straight, wavy, or curly, and pick extensions with similar texture.
Now, let’s talk types of hair:
- Real Hair: Also known as human hair extensions, these are made from real human hair and offer a natural look and feel. They can be styled and dyed just like your own hair but may require more maintenance.
- Synthetic Hair: Made from artificial materials, synthetic extensions generally cost less than human hair extensions. However, they can’t be styled using heat tools and may not have the same longevity.
When choosing between real and synthetic hair extensions, consider these key differences to determine which option is best for you.
Color is another essential aspect to consider. If you prefer a natural look, choose extensions that closely match your hair color. For a more daring touch, pick a contrasting color or highlights that complement your natural shade.
Professional Help and Special Occasions
When putting in hair extensions, getting professional help from a qualified hairstylist is always a great idea. They’ll guide you through the entire process and ensure you choose the right type of extensions for your specific needs and hair type.
Special occasions call for stunning hair, and extensions are a fantastic way to amp up your style. Whether you’re heading to a wedding, a gala, or any other important event, hair extensions can transform your look and take it up a notch.
While seeking professional help might require more of an investment, it’s especially worth it for special occasions.
Here are a few benefits of going to a professional stylist:
- A skilled hairstylist will match the extensions to your hair color and texture, ensuring a natural look
- The professional application of extensions ensures they last longer and don’t damage your hair
- They can offer expert advice on extension care and maintenance
Don’t hesitate to explore different professionals and businesses that offer these services. You’ll be able to find one that fits your specific needs and desires. And remember, with the right extensions and professional application, you’ll look and feel fabulous on your special occasion!
Summing Up How To Put Hair Extensions In
So there you have it! The answer to the question, “how do you put hair extensions in.”
For many types of extensions, you can handle it on your own. But, especially for special occasions, it may be worth getting professional help.