Imagine walking into a crowded room, a gust of wind catches you off guard, or you lean over to pick something up. If your first instinct is to reach up and check your hairline, you aren’t alone. For many wig wearers, the fear of a “wardrobe malfunction” is a constant background noise that distracts from the joy of looking and feeling your best.
But here is the truth that often gets lost in the conversation about adhesives and glues: true security comes from the mechanics of the fit, not just what you stick to your skin. By mastering a few professional techniques, you can transform a standard “out-of-the-box” wig into a custom-fitted piece that moves with you, not against you. In this guide, we will explore advanced wig attachment methods & customization techniques that rely on structural enhancements—specifically clips, combs, and elastic bands—to give you an iron-clad hold without the need for daily adhesives.
The “Foundation First” Principle: Start with What You Have
Before you thread a needle or buy a single accessory, there is a critical “lightbulb moment” that many new wearers miss. Most high-quality wigs come equipped with a built-in security system that is often underutilized.
70% of slipping issues can be resolved simply by adjusting the nape straps.
Flip your wig inside out and look at the nape (the back of the neck area). You will typically see two straps, often made of Velcro or a bra-strap style slider. These allow you to tighten or loosen the circumference of the cap by up to an inch.
- The Goldilocks Zone: The wig should feel snug, like a comfortable embrace, but it should never squeeze. If it leaves an indent on your skin after 30 minutes, it is too tight and may cause headaches (the “wig headache” is real, but avoidable). If it shifts when you shake your head “no,” it is too loose.
Once you have optimized the factory settings, you are ready to evaluate if you need additional reinforcements.
Choosing Your Security System: Clips, Combs, or Bands?
Not all security methods are created equal, and the “best” method depends entirely on your biological hair, your lifestyle, and your sensitivity levels. Use this framework to decide which route is right for you.
1. Pressure-Sensitive Clips
- Best For: Individuals with some biological hair.
- How They Work: These small metal clips snap open and shut (similar to a barrette). They have “teeth” that grip into your natural hair to anchor the wig in place.
- The “Aha” Moment: Quality clips are lined with silicone to prevent breakage of your own hair.
2. Wig Combs
- Best For: Adding stability without the “grip” of a clip; often used at the nape.
- How They Work: These are wire or plastic combs that slide underneath your wig cap or hair bun. They provide directional resistance.
- The Reality Check: Combs are excellent for keeping a wig from sliding back, but they offer less lateral (side-to-side) security than clips.
3. The Adjustable Elastic Band (The “Glueless” Grail)
- Best For: Everyone, including those with total hair loss.
- How It Works: A thick elastic band is sewn from ear-to-ear inside the back of the wig.
- The Benefit: This method pulls the wig flat against the head, mimicking the tension of a glues install without the chemicals. It is widely considered the most secure method for active lifestyles.
Master Class: How to Customize Your Wig Cap
If you are ready to customize, you will need a few simple tools: a curved upholstery needle (easier to maneuver inside a wig cap), heavy-duty thread (nylon is best), and your chosen attachment hardware.
Method A: Installing Pressure-Sensitive Clips
Strategic placement is everything. You don’t want clips digging into sensitive pressure points.
- Map the Spots: The most effective anchor points are usually roughly an inch behind the ears and at the nape of the neck. Avoid the delicate temple area if you have a sensitive hairline.
- Orientation: Sew the clips so the “teeth” face the direction of the pull.
- Side clips: Teeth should face downward/inward.
- Nape clips: Teeth should face upward.
- The Stitch: Sew through the holes in the clip and catch the sturdy material of the wig cap (the wefts or the ribbon). Crucial Warning: Never sew through a monofilament or lace top; these materials are too delicate and will tear.
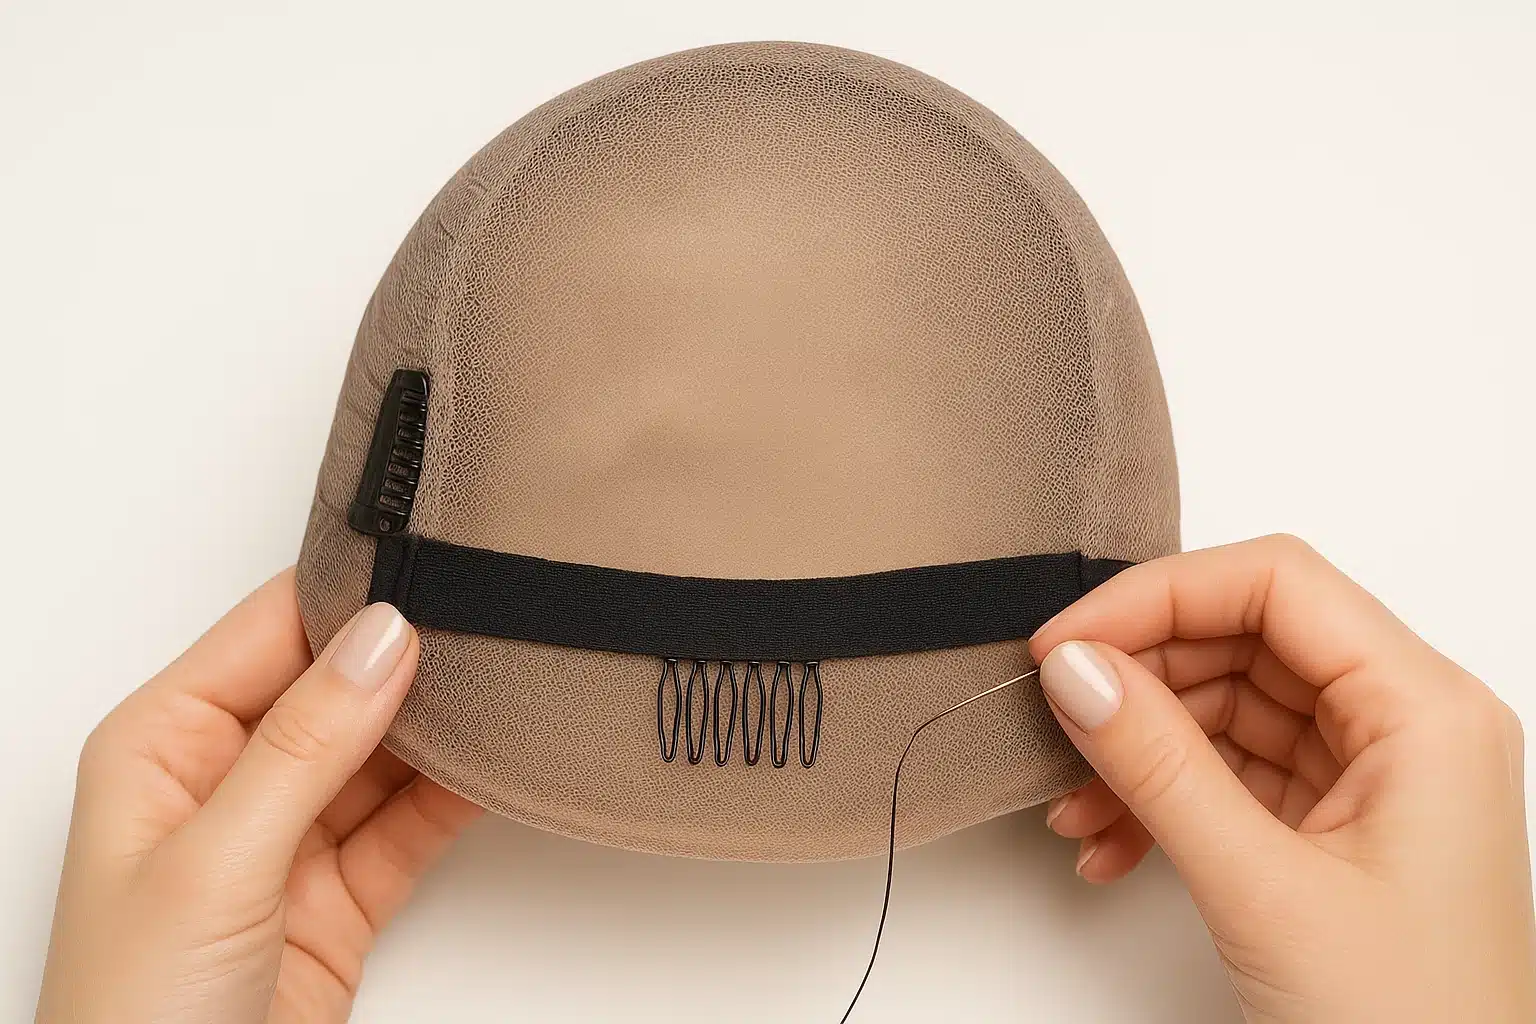
Method B: The Elastic Band Method
This is the secret weapon for laying a lace front flat without glue.
- Measure: Put the wig on. Measure the distance from just behind your left ear, around the back of your head (at the base of the skull), to just behind your right ear.
- Cut & Test: Cut your elastic band about 1 to 2 inches shorter than your measurement. You want tension, but not a tourniquet. Pin it in place and try the wig on before sewing.
- Sew: Attach the ends of the elastic band to the ear tabs of the wig cap. Ensure the band sits low at the occipital bone (the bump at the back of your head). This prevents the wig from riding up.
Troubleshooting Common Security Issues
Even with customizations, you might run into hurdles. Here is how to solve them like a pro.
“My wig is secure, but it gives me a headache.”
You have likely over-corrected. If you are using an elastic band, it is too short. If you are using clips, you may have placed them directly over a sensitive nerve or vein. Move the clips slightly higher or lower, or loosen the band by half an inch.
“The wig still slides back during the day.”
This is usually a friction issue. If you have bio hair, it might be too slippery (freshly washed). If you have total hair loss, the velvet or silicone inside the cap isn’t gripping your skin.
- The Fix: Combine your sewn-in method with a wig grip band (a velvet headband worn under the wig). The friction of the velvet against the wig cap creates a “Velcro-like” effect that is virtually immovable.
“The clips are pulling my natural hair.”
You might be grabbing too little hair in the clip, causing drag on a few strands. Open the clip, re-position it to grab a slightly larger section of hair, and snap it shut. Ensure your clips have silicone lining—this buffer is essential for protecting fine biological hair.
Frequently Asked Questions
Q: Can I add clips to a 100% hand-tied cap?
A: Yes, but you must be extremely gentle. Do not sew through the hand-tied mesh. Look for the reinforced seams or “stays” (the structure that gives the cap its shape) and anchor your thread there.
Q: Will sewing an elastic band damage the lace front?
A: Not if you attach it correctly. The band should be sewn to the ear tabs, which are usually reinforced. Never sew the band directly to the lace material at the front hairline.
Q: I have a sensitive scalp. Which method is best?
A: Avoid clips, as they apply localized pressure. The elastic band method is generally more comfortable as it distributes tension evenly around the head. Alternatively, a silicone wig grip band worn under the wig requires no sewing and offers excellent comfort.
The Path to Confidence
Customizing your wig isn’t just about mechanics; it’s about ownership. When you take the time to tailor your wig to your unique head shape, you stop being a person “wearing a wig” and start being a person with great hair.
Start small. Check your adjustable straps today. If you need more security, try the elastic band method next—it is a game-changer for many. As you become more comfortable with the anatomy of your wig, you will find the perfect combination that lets you live your life without a second thought about your hairline.