If you have ever worn a wig, you know the “mirror check” all too well. It’s that moment before you leave the house where you lean in close, scrutinizing your forehead, asking yourself the same anxious question: “Does this look like growing hair, or does it look like a wig?”
For years, the barrier to a truly undetectable hairline was high. It required professional customization, bleaching knots, and an artistic hand with tweezers. But the landscape of alternative hair has shifted dramatically.
Enter the conversation around Outre’s Melted Hairline collection. You may have seen the viral videos or heard the term “melting” thrown around in beauty communities. But beyond the hype, what is actually happening at the technical level? Is this technology a genuine solution for the everyday wearer, particularly those experiencing hair loss who crave realism without the fuss?
Let’s decode the science behind the “melt” and explore how this construction impacts the one thing we all want: confidence.
The Science of the “Melt”: Why It Works
To understand if a Melted Hairline wig is right for you, we first have to strip away the marketing jargon and look at the optics. The primary “tell” of a traditional wig is usually the lace—the mesh material that the hair is tied to.
In older or standard wig constructions, the lace can be thick or stiff. When light hits thick lace, it reflects, creating a visible grid pattern or a “line of demarcation” on your forehead.
The “Melted” technology addresses this through light diffusion.
1. HD Lace Transparency
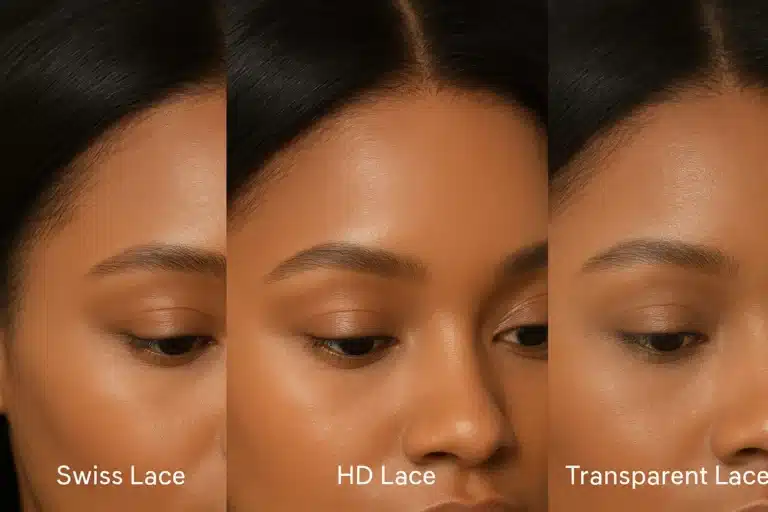
The core differentiator is the use of HD (High Definition) transparent lace. This material is significantly softer and thinner than standard Swiss lace. Because it is thinner, it lays flatter against the skin, reducing the shadow created by the edge of the wig. When light hits HD lace, it passes through to your skin tone rather than reflecting off the mesh grid.
2. The Gradient Density
A natural human hairline is never a solid wall of density. It starts sparse and gradually thickens. Outre’s Melted Hairline mimics this biological growth pattern. By knotting fewer hairs at the very edge and increasing density as you move back, the wig creates a “soft focus” effect that tricks the eye into seeing scalp rather than fabric.
Outre Ecosystem: Melted vs. Perfect Hairline
One of the most common sources of confusion for beginners is the difference between Outre’s “Melted Hairline” and their “Perfect Hairline” collections. While both aim for realism, they serve different aesthetic needs.
Understanding this distinction is vital so you don’t end up with a style that doesn’t match your preferences.
| Feature | Melted Hairline | Perfect Hairline |
|---|---|---|
| Lace Area | Typically features an expansive ear-to-ear frontal effect. | often features a 13×4 or 13×6 larger lace area. |
| The “Look” | Soft, gradual, and “pre-melted.” Designed to look like it has already been glued down. | sharper, more defined “fresh from the salon” look. |
| Best For | Beginners or those who want a flat, realistic look with minimal work. | Experienced wearers who want to do heavy customization or intricate styling. |
| Key Tech | Enhanced with a pre-attached elastic band for a secure, glueless fit. | Focuses on parting space versatility. |
The Geometry of Style: M-Shape vs. V-Shape
When choosing a wig, most people look at the curl pattern or color first. However, the shape of the hairline is actually what frames your face. The Melted Hairline collection offers variations that rely on facial geometry principles.
The Dynamic M-Shape
You might notice some units feature a hairline that dips slightly at the temples and peaks in the middle-sides.
- The Effect: This mimics a mature, natural hairline.
- Who it’s for: It is incredibly flattering for round or oval faces, as the “M” shape adds angles and definition to the face, often perceived as a more dynamic, youthful structure.
The Traditional V-Shape (Widow’s Peak)
Other units come with a subtle point in the center of the forehead.
- The Effect: This draws the eye vertically.
- Who it’s for: This is excellent for heart-shaped or square faces, as it creates a line of symmetry that balances wider jawlines.
The “Instruction Manual” They Forgot to Write
Even with the best technology, a wig is only as good as the installation. Many beginners buy a high-quality wig and feel disappointed because they missed a few critical “invisible” steps.
Here is the technical troubleshooting guide to ensure the technology works for you.
1. The “Air Tab” Secret
This is the number one reason for a bulky fit behind the ears. On many ear-to-ear lace wigs, there are tabs of lace that extend down by the ears.
- The Fix: You must cut the lace around the ear tab to fit your specific ear shape. If you don’t, the lace will buckle and lift when you move your head. Trimming these “air tabs” allows the wig to lay flush against the temples.
2. The Two-Temperature Drying Method
If you decide to use a melting spray or gel (even for a “glueless” wear), temperature control is your best friend.
- Step A (Cool Air): Use cool air from your blow dryer to make the adhesive or spray “tacky.”
- Step B (Warm Air): Once the lace is pressed down, switch to warm air to “melt” the lace into the skin. This bonds the HD lace to your complexion for that invisible finish.
3. The 4-Finger Rule
Where should your wig sit? A common mistake is pulling the wig too far forward, which shrinks the forehead and looks unnatural.
- The Rule: Place four fingers flat above your eyebrows. The hairline of the wig should start just above your top finger. This maintains natural facial proportions.
Mastering Realism: The Imperfection Philosophy
Ironically, what makes a wig look “fake” is often that it looks too perfect. Real hair has flyaways, different textures, and movement.
- Matte is Major: Synthetic fibers can sometimes have a “factory shine.” To combat this, use a dry shampoo. Spray it lightly from a distance and brush it through. This takes the shine down to a realistic luster that mimics healthy human hair.
- Create “Wispies”: Don’t be afraid to pull out a few tiny hairs around the hairline and temples. Using a little holding spray (avoid heavy gels that can cake up on synthetic fiber) to style these “baby hairs” softens the transition between the lace and your skin.
Frequently Asked Questions
Q: Is the Melted Hairline collection truly glueless?
A: Yes, structurally. They come with a pre-attached wide elastic band that secures the wig to your head without adhesive. However, for the visual effect of the lace disappearing completely into the skin, many wearers prefer to use a little bit of lace spray or mousse to tack down the very edge.
Q: Can I use heat on these wigs?
A: Most Outre Melted Hairline wigs are heat-safe up to 400°F. However, synthetic fiber has a “memory.” Once you heat style it straight or curly, it will stay that way until heat-styled again. We recommend keeping heat usage low (around 250°F-300°F) to extend the lifespan of the fibers.
Q: How do I choose the right lace tint?
A: The HD lace is transparent, meaning it is colorless. If you have a darker complexion, the transparent lace might look “ashy.” You can easily remedy this by applying a powder foundation that matches your skin tone to the underside of the lace before putting it on.
The Verdict
The “Natural Look” isn’t just about vanity—it’s about the freedom to go about your day without worrying about your hair. Outre’s Melted Hairline technology bridges the gap between expensive, custom human hair units and accessible, ready-to-wear synthetic options.
By understanding the mechanics of HD lace and mastering a few simple customization techniques, you can achieve a look that is undetectable, comfortable, and uniquely yours.
If you are ready to explore which face-framing style suits you best, taking the time to educate yourself on these details is the best first step toward a purchase you’ll love.