Securing a hair topper or partial hairpiece is completely different from securing a full wig. If you’re transitioning from clip-ins because your biological hair is starting to feel the strain, you are absolutely not alone. Finding the right adhesive for a smaller hairpiece is a unique, high-stakes challenge that requires a deep understanding of your scalp, your hairpiece’s base, and the physical forces at play.
Before we dive into the specialized techniques for securing partials, it helps to understand the full landscape of bonding options. If you’re completely new to the world of alternative hair, reading our comprehensive guide to finding your perfect wig adhesive hold will provide the foundational knowledge necessary to select the right product for your unique body chemistry. Today, we’re focusing entirely on the exact strategies you need to seamlessly and safely secure your topper or partial hairpiece.
The Physics of the Perfect Hold: Why Toppers Need a Different Approach
Think of a full-head wig like a snug winter beanie: the weight and tension are distributed evenly across your entire cranium. A hair topper or partial system, however, is concentrated on specific areas of thinning. This creates what experts call localized tension.
When you first start wearing a topper, clips are usually the go-to securement method. They’re easy, intuitive, and quick. But over time, the concentrated downward weight of a partial piece pulling on the same thin, fragile hairs day after day can lead to traction alopecia—the very hair loss you’re trying to conceal. When your biological hair becomes too weak to support clips, transitioning to skin-safe adhesives and tapes is not just a styling choice; it’s a vital step for preserving your remaining hair health.
Demystifying the Chemistry: What Actually Goes on Your Scalp
When you start researching adhesives, the vocabulary can feel overwhelming. Let’s break down the science of what you are actually putting on your skin so you can make informed, safe choices.
Weave Glue vs. Wig Glue
A common beginner mistake is assuming all hair glues are created equal. They aren’t.
- Weave Glue: Often latex-based with a high rubber content, weave glue is formulated specifically for short-term, hair-on-hair track bonding. It is highly acidic and toxic to open skin pores. If you apply weave glue to a delicate lace topper, the latex will permanently ruin the mesh base.
- Wig/Toupee Glue: These are either water-based copolymers (like Ghost Bond) or acrylic-based formulas. They are scientifically designed for skin-to-poly or skin-to-lace contact. They withstand body heat and natural oils without containing harsh toxic solvents.
The Danger of Household Glues
You may have seen viral internet horror stories about using gorilla glue on hair. While it might seem like common sense to avoid household hardware adhesives, desperation for a secure hold sometimes leads to dangerous decisions. Household polyurethane glues contain diphenylmethane diisocyanate—a severe skin sensitizer that bonds irreversibly to the organic proteins in your hair and skin. Using these results in severe chemical burns and permanent follicle destruction that often requires surgical removal. Always stick to medical-grade, scalp-safe products.
The Base Compatibility Guide: Matching Adhesives to Your Hairpiece
The secret to a flawless, long-lasting hold isn’t just about buying the strongest glue—it’s about matching the adhesive to your specific hairpiece base material.
Polyurethane (Poly) Perimeters
If your topper has a smooth, plastic-like polyurethane perimeter around the back and sides, you have the perfect substrate for tapes. Inert, medical-grade double-sided tapes (like Walker Tape 1522 or Supertape) adhere beautifully to poly without leaving a gummy, impossible-to-clean residue.
Lace Fronts and Monofilament Bases
Lace requires a different approach. Because it is a porous mesh, tape can sometimes leave a shine that gives away your secret. This is the domain of liquid glues. A high-quality water-based copolymer glue melts invisibly right into the lace mesh, creating a seamless, undetectable front edge.
The “Edges” Paradox
Many beginners fall into the trap of believing they should glue their edges directly over their biological hairline. Let’s look at the anatomy of your hair: applying any liquid adhesive directly onto active hair roots guarantees you will rip out those follicles during removal.
The Golden Rule: The edge of an adhesive topper must never overlap biological hair unless protected by a specialized barrier film and later dissolved meticulously with solvent. If there is biological hair under your topper’s boundary line, you must either use clips, integrate a halo wire, or shave a small 0.5-inch border to allow direct skin-to-base tape contact.
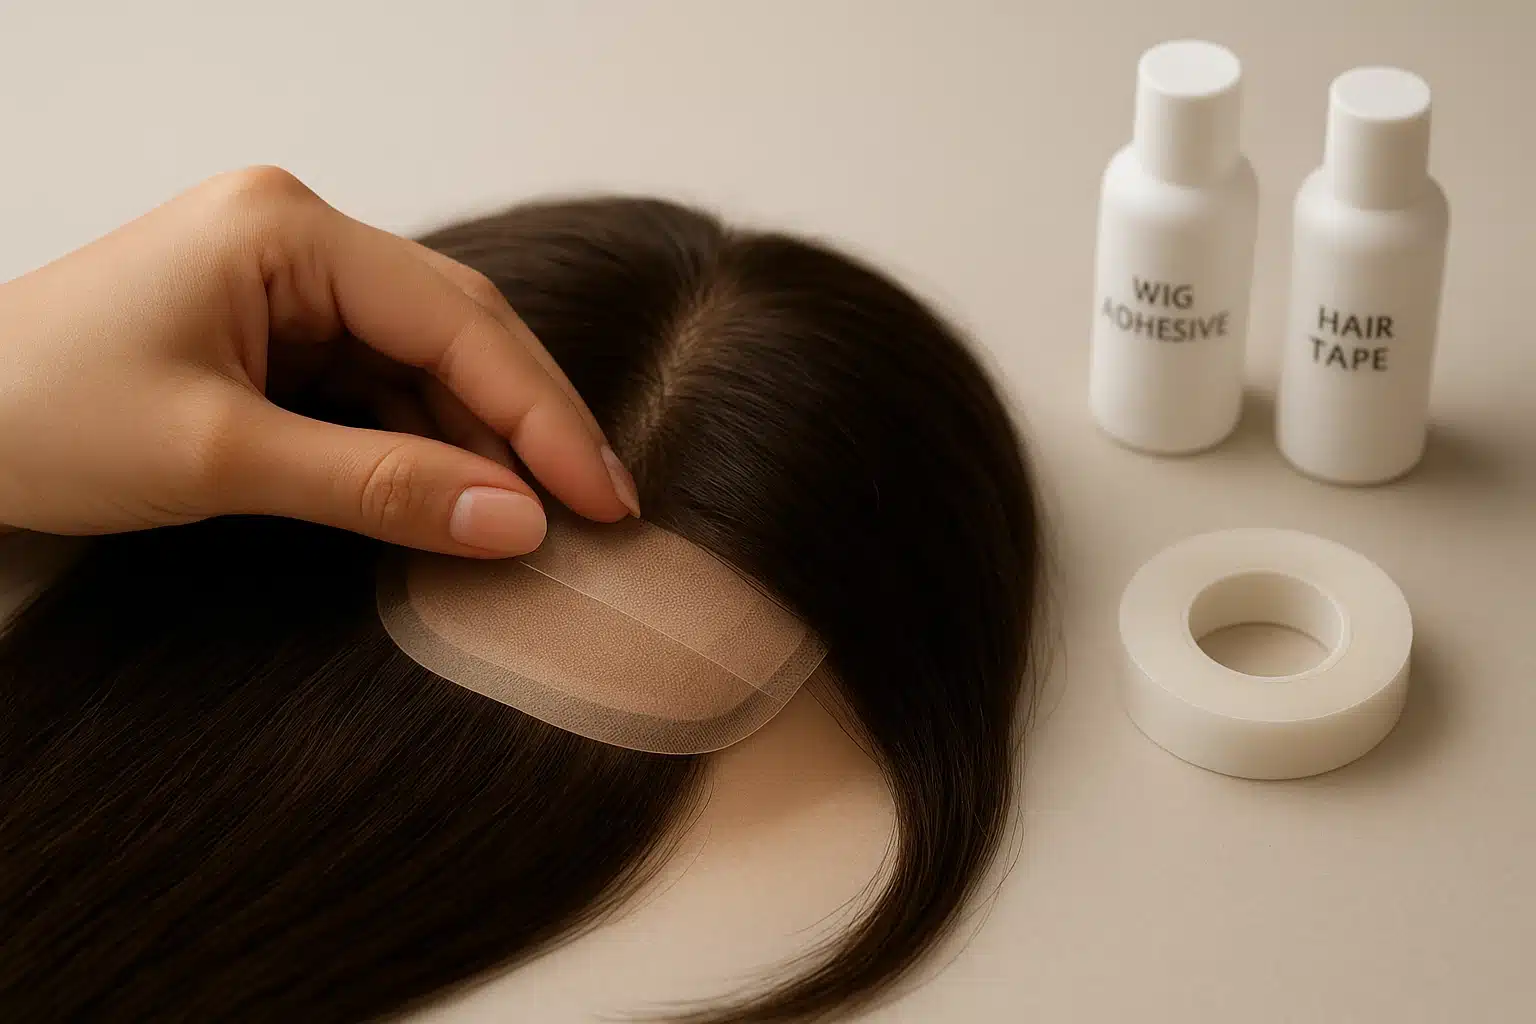
Mastering the Hybrid Method for Partial Hairpieces
For smaller partial pieces, the “Hybrid Method” offers the best of both worlds: the easy cleanup of tape and the invisible hairline of liquid glue. Here is how to execute it perfectly.
Step 1: Scientific Scalp Preparation
Adhesives hate oil and sweat. Start by wiping your bonding area with 70%+ isopropyl alcohol to remove surface oils. Next, apply a skin barrier layer (like Walker Scalp Protector). This acts like a primer, blocking your sweat from degrading the adhesive while protecting your skin from irritation.
Step 2: The Tape Horseshoe
Take your pre-cut, double-sided contour tapes and apply them around the back and side polyurethane perimeter of your topper, forming a U-shape or horseshoe. Leave the protective backing on the tape until you are ready to place the piece on your head.
Step 3: The Glue Front Hairline
Apply 2 to 3 paper-thin layers of water-based copolymer glue directly to your forehead skin just below your natural hairline (never apply liquid glue directly to the lace first).
The “Cure” Checkpoint
This is where most beginners fail: you must wait 7 to 10 minutes for each layer of glue to dry. How do you know it’s ready? The glue will shift from a milky white lotion consistency to completely clear and aggressively tacky to the touch. Only when it is entirely clear should you gently press the lace front into the adhesive.
(Pro Tip: If you have stubborn flyaways around your face, use a light, alcohol-free glue designed specifically for wig styling along the hairline edges. This freezes the hairs in place without disrupting the structural bond underneath.)
Healthy Scalp Preservation and Safe Removal
Applying your topper correctly is only half the battle; removing it safely is what dictates your long-term scalp health. Never pull or rip a hairpiece off.
You need two distinct formulas for safe removal:
- Lace Release: This alcohol-based spray is designed specifically to break the bond between the adhesive and delicate lace mesh. It allows you to lift the topper away without pulling the fragile hair fibers through the net.
- Skin Solvent: Once the topper is off, you’ll likely have sticky acrylic or copolymer residue left on your skin. A citrus-based solvent (like C-22) safely dissolves this residue in minutes.
After removal, wash your scalp and the topper base thoroughly with a clarifying shampoo to prevent follicle-clogging buildup.
Frequently Asked Questions (FAQ)
Can I use a wig grip with a hair topper?
Usually, no. Because a full-head wig grip is designed to wrap around the entire circumference of your head, it cannot align with the smaller surface area of a topper without peeking through. Toppers require localized securement like medical tape, Velcro grippers, or halo wires.
Tape vs. glue: Which has the cleaner cleanup?
Tape generally offers a much cleaner cleanup, provided it is applied to a polyurethane base. Liquid glue requires more meticulous dissolving and washing, especially when used on lace, but it provides a more natural-looking hairline.
Can I buy professional-grade wig glue at Target or drugstores?
Typically, consumer retail stores only carry basic styling adhesives, temporary edge controls, or household glues (which are dangerous for skin). For multi-day or multi-week longevity that protects delicate lace, you need specialized, salon-grade copolymer or acrylic systems sourced from trusted alternative hair distributors.
How do I prevent adhesive from seeping through the lace mesh into the hair fibers?
The key is the “Cure Checkpoint.” If you press your lace into liquid glue while it is still white and wet, it will ooze through the microscopic holes in the mesh and permanently mat the hair fibers. Wait until the glue is 100% clear and tacky before making contact.
Moving Forward with Confidence
Transitioning to adhesives for your hair topper doesn’t have to be intimidating. By understanding the chemistry of what you’re using, respecting the physics of your hairpiece, and strictly following safe application and removal protocols, you can achieve a flawless, secure look that lets you live your life without worry.
With nearly two decades of experience helping individuals navigate hair loss, we believe that education and compassionate care are the keys to reclaiming your confidence. Take your time, experiment with the hybrid method, and soon, securing your hairpiece will become second nature.