You’ve carefully placed your wig, perfectly aligning the front lace. Looking straight into the mirror, the forehead looks absolutely flawless. But then, you turn your head. Suddenly, the illusion breaks. There’s a glaring disconnect where your natural sideburns meet the wig’s ear tabs, or perhaps a bulky, unnatural shelf sitting at the nape of your neck. If you’ve experienced this frustrating moment, you are far from alone. The ultimate test of a realistic wig install doesn’t actually lie in the crown or the length—it’s found at the perimeter edges.
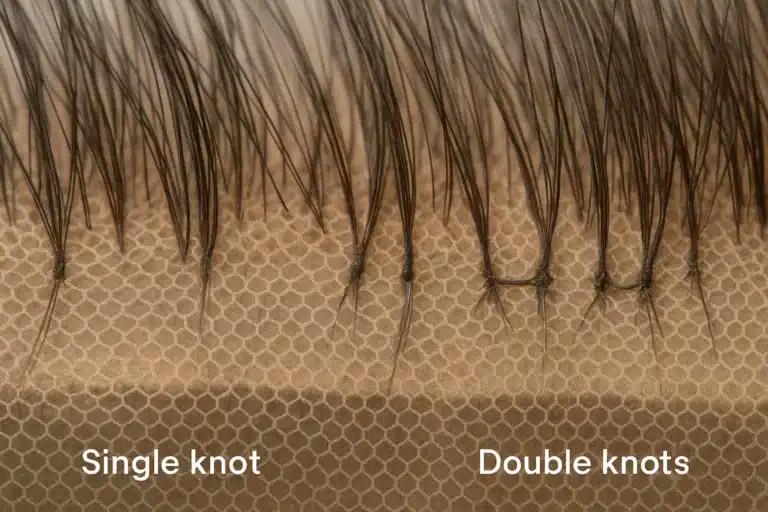
Before attempting advanced edge customization, it helps to understand the foundation of your piece. Mastering the anatomy of a perfect wig—specifically how density distribution and texturing along the perimeter are constructed—lays the essential groundwork for any successful blending technique. Once you understand how your wig is built, you can confidently tackle the true “make-or-break” zones: the sideburns and the nape.
The Anatomy of Perimeter Realism: Why Edges Make or Break Your Look
If you’ve ever felt overwhelmed by wig tutorials, it’s likely because the educational landscape often assumes a one-size-fits-all hair profile. Most videos showcase models with either fully intact, dense natural hairlines or complete hair loss. But what if you fall somewhere in the middle? Millions of wig wearers have sparse, uneven hair, are transitioning between textures, or have natural bio-hair (your existing natural hair) that differs in color from their wig.
When the sideburns and nape aren’t properly integrated, it creates an unmistakable “wiggy” appearance. Often, wearers will notice a strange disconnect and wonder how to fix a proper wig fitting sideburns gap. This common challenge happens when the cap’s structured ear tabs don’t perfectly align with your natural hairline’s geometry.
To achieve an utterly seamless transition, we have to move beyond just hiding your hair. We need to integrate it.
The Sideburn Seamless Interior: Mastering the Ear Tabs
Many outdated guides will tell you to simply shave off your natural sideburns to get a wig to lay flat. At Wig Superstore, we believe in protecting and preserving your natural hair at all costs. Here are the advanced techniques to blend those tricky sideburn areas gracefully.
The C-Curve Mapping Method
Cutting the lace around your ears is nerve-wracking. Cut too little, and it bunches up; cut too much, and you risk slicing into the wig’s structural ear wire, which ruins the cap’s ability to lay flat against your temple.
Instead of cutting blindly, use the C-Curve Mapping Method:
- Place the wig exactly where you want it on your forehead.
- Take a washable white eyeliner pencil and trace the natural crease where your ear meets your head.
- Remove the wig and cut along the outside of that line, intentionally leaving a 2-millimeter margin of lace. This tiny margin gives you just enough material to safely melt onto your skin without overlapping onto your ear cartilage.
Bio-Integration Shading
What if your natural sideburns are thick or a different color than your wig? Instead of trying to aggressively flatten and hide them under a thick wig cap, bring them into the fold.
Using a technique called Perimeter Shadowing, pull a tiny, 1/4-inch sliver of your natural bio-hair out from under the wig cap. Brush this fine layer of hair over the wig’s ear-tab. Then, take a matte contour powder or a root touch-up spray that matches the root shade of the wig, and gently color-match your bio-hair to the lace. This bridges the visual gap between the lace edge and your real skin, creating a beautifully soft, gradient transition.
The Nape Realism Protocol: Defeating “Nape-Lift”
The nape of the neck is a highly mobile area. Every time you look down at your phone, the skin and muscles stretch. If your wig isn’t secured properly, it will ride up the back of your head—a frustrating phenomenon known as “nape-lift.”
The Physics of Cap Tension
Nape-lift isn’t usually an adhesive failure; it’s a physics problem. It occurs when the wig cap is slightly too small or the adjustable straps at the back are pulled too tightly. When the neck bends, the tension forces the wig to slide up and over your occipital bone (the prominent bump at the lower back of your skull).
Before worrying about how to keep wig from slipping with heavy glues, try the Relaxed Strap + Elastic Band Integration method. Loosen the nape straps entirely to remove vertical tension. If you need security, sew a wide elastic band horizontally from ear-tab to ear-tab inside the wig. The band hugs the circumference of your head, providing a secure grip without pulling the nape upwards.
The Nape Pinch Test
Before applying any adhesive or styling an updo, do a quick self-assessment. Put your wig on and look straight down at the floor. Reach to the nape of your neck and try to pinch the wig cap. If it feels drum-tight and you can’t pinch a tiny amount of slack, your cap is adjusted too tightly. Loosen the straps until you can just barely pinch the fabric while looking down.
Perimeter Melting Chemicology: Adhesives and Gels Explained
Blending edges seamlessly requires understanding the chemistry of the products you are using on your skin. Mixing the wrong products is the primary cause of lifting lace and flaky white residue.
- Water-Based Edge Gels: These are fantastic for styling baby hairs, but they are the enemy of lace glues. Because they are water-based, the moisture can reactivate your lace adhesive, causing your perfectly melted ear tabs to slide around.
- Alcohol-Based Melting Sprays: These sprays lock the lace down with incredible hold and dry invisibly. However, because they contain alcohol, they can dry out sensitive skin around the perimeter. Always use a skin-protectant barrier spray before applying.
Pro-Tip: The White Residue CureDid you accidentally use too much product and end up with a crusty white residue along your ear tabs? Don’t panic and pull the wig off. Dip a Q-tip in 70% isopropyl alcohol and gently roll it over the white residue. The alcohol breaks down the dried polymers in the gel instantly, restoring a clear, natural blend.
The Ultimate Troubleshooting Matrix
Different hair scenarios require different blending techniques. Identify your profile below for instant fixes:
| Your Hair Profile | The Challenge | The Advanced Solution |
|---|---|---|
| Thick, Dark Sideburns | Hiding bulk under a lighter colored wig cap. | The Double-X Method: Smooth sideburns back with edge control, secure them flat against the scalp with two bobby pins in an “X” shape, and use a wig cap that matches your skin tone, not your natural hair. |
| 4C Natural Edges | Blending highly textured edges with a silky, straight lace frontal. | Texture Blending: Apply a styling pomade to your natural edges, then use a gently warmed styling comb (on a very low setting) to smooth your bio-hair into the texture of the synthetic or human hair wig fibers. |
| Sparse / Uneven Perimeter | Lack of natural baby hairs to cover the lace grid. | Custom Micro-Plucking: Pluck the wig’s ear tabs heavily so they mimic your natural sparse density. A wig hairline that is too thick looks unnatural against sparse bio-hair. |
Frequently Asked Questions (FAQ)
How do I hide my sideburns under a wig?
If you want to completely conceal them, use a strong hold gel to slick the sideburns upward and backward, hooking them behind your ear. Secure them flat with a wig cap. If your hair is very thick, the Double-X bobby pin method (pinning the hair tightly to the scalp) will prevent bulky bumps under the ear tabs.
What do I do if my own hair sticks out of the back of my wig?
If your natural nape hair extends lower than the wig’s hairline, use a firm-hold gel to sculpt your natural kitchen/nape hair in an upward direction before putting on your wig cap. You can also use a temporary root touch-up spray to color-match those bottom hairs to the wig, so even if they peek out, they blend right in.
What is the four-finger rule for placing a wig hairline?
The four-finger rule is a classic beginner’s guide to finding your natural hairline placement. Place your index finger horizontally resting just above your eyebrow. Where your pinky finger lands (about four finger-widths up) is generally where your natural hairline begins, and exactly where the front lace of your wig should sit.
Next Steps on Your Wig Journey
Mastering the blend at your sideburns and nape transforms a wig from an accessory into a natural extension of yourself. It requires a bit of practice, a touch of color theory, and an understanding of your unique hair profile. Remember, there is no single “right” way to wear your hair—only the way that makes you feel the most beautiful, comfortable, and confident.
Take your time experimenting with these advanced techniques. At Wig Superstore, we know that hair loss and hair transition journeys are deeply personal. By equipping yourself with the right knowledge and high-quality products, you can ensure that every day is a good hair day.