Have you ever unboxed a stunning new wig, fallen in love with the texture and style, but paused when you looked closely at the hairline? It’s a common moment of hesitation. Even with high-quality wigs, you might notice tiny black dots where the hair strands are tied to the lace. These knots, while necessary for construction, can create a “grid” effect that looks like seeds on a strawberry, instantly distinguishing the wig from your natural scalp.
The difference between a wig that looks like a nice accessory and one that looks like it’s growing directly from your head often comes down to one technical skill: bleaching the knots. It sounds intimidating—applying chemicals to a delicate lace base can feel risky—but with the right technique, it is the standard for customization. Perfecting this technique is a cornerstone of mastering the illusion of a flawless, natural wig hairline.
In this guide, we will walk you through the precise, safety-first method to bleach your knots without damaging the hair or the lace. We aren’t just covering the “how”; we’re covering the “why,” the science of the mixture, and exactly what to do if things don’t go perfectly according to plan.
The “Why”: Understanding Wig Knots
Before we mix any chemicals, it helps to understand the architecture of your wig. In high-quality hand-tied wigs, individual strands of hair are double-knotted onto the lace mesh to ensure durability. Because the hair has pigment (color), that knot appears as a dark dot against the transparent lace.
Bleaching undergoes a chemical process called oxidation, which removes the pigment from the knot, lightening it to a shade that blends with your skin tone. The goal isn’t to turn the knots white; it’s to make them invisible against your scalp.
Phase 1: The Essential Toolkit & Safety Prep
Success in bleaching isn’t about speed; it’s about preparation. You need to create a workspace that allows for precision. Here is your professional checklist:
- Powder Lightener (Bleach): Choose a high-quality brand (often blue or white powder).
- Developer: Crucial Tip: Stick to 20 Volume Developer or 30 Volume Developer. Avoid 40 Volume as a beginner; it processes too fast and increases the risk of damaging the lace, which causes shedding.
- Mixing Bowl & Brush: Plastic is best; avoid metal bowls as they can react with the bleach.
- Aluminum Foil: To wrap the wig during processing.
- Gloves: To protect your hands.
- Neutralizing Shampoo: Often called “Purple Shampoo” to remove brassiness.
- Spray Bottle with Water: To tame flyaways.
The “Pre-Flight” Check
Before you mix your bleach, you must prepare the wig to ensure no bleach touches the hair strands you want to keep.
- Turn the wig inside out. Pin it to a foam head if you have one, or lay it flat on a foil-covered surface.
- Tame the flyaways. Use your spray bottle to dampen the baby hairs and brush them away from the lace.
- Create a barrier. (Optional but recommended) Some stylists apply a very thin layer of Got2b styling gel to the hair behind the knots to hold them down and prevent bleach bleed-through.
Phase 2: The Core Process
This is where the magic happens. The single most common mistake beginners make is mixing the bleach to the wrong consistency.
Step 1: The Perfect Mix
If your mixture is too runny, it will seep through the lace and bleach the roots of the hair (resulting in “hot roots”). If it’s too dry, it won’t process the knots evenly.
The Golden Rule: You are aiming for the consistency of thick cake frosting or peanut butter. When you lift your brush, the mixture should stand up in peaks and not drip.
Start with a 1:1 ratio of powder to developer, but add the developer slowly. You can always add more liquid, but you can’t take it away.
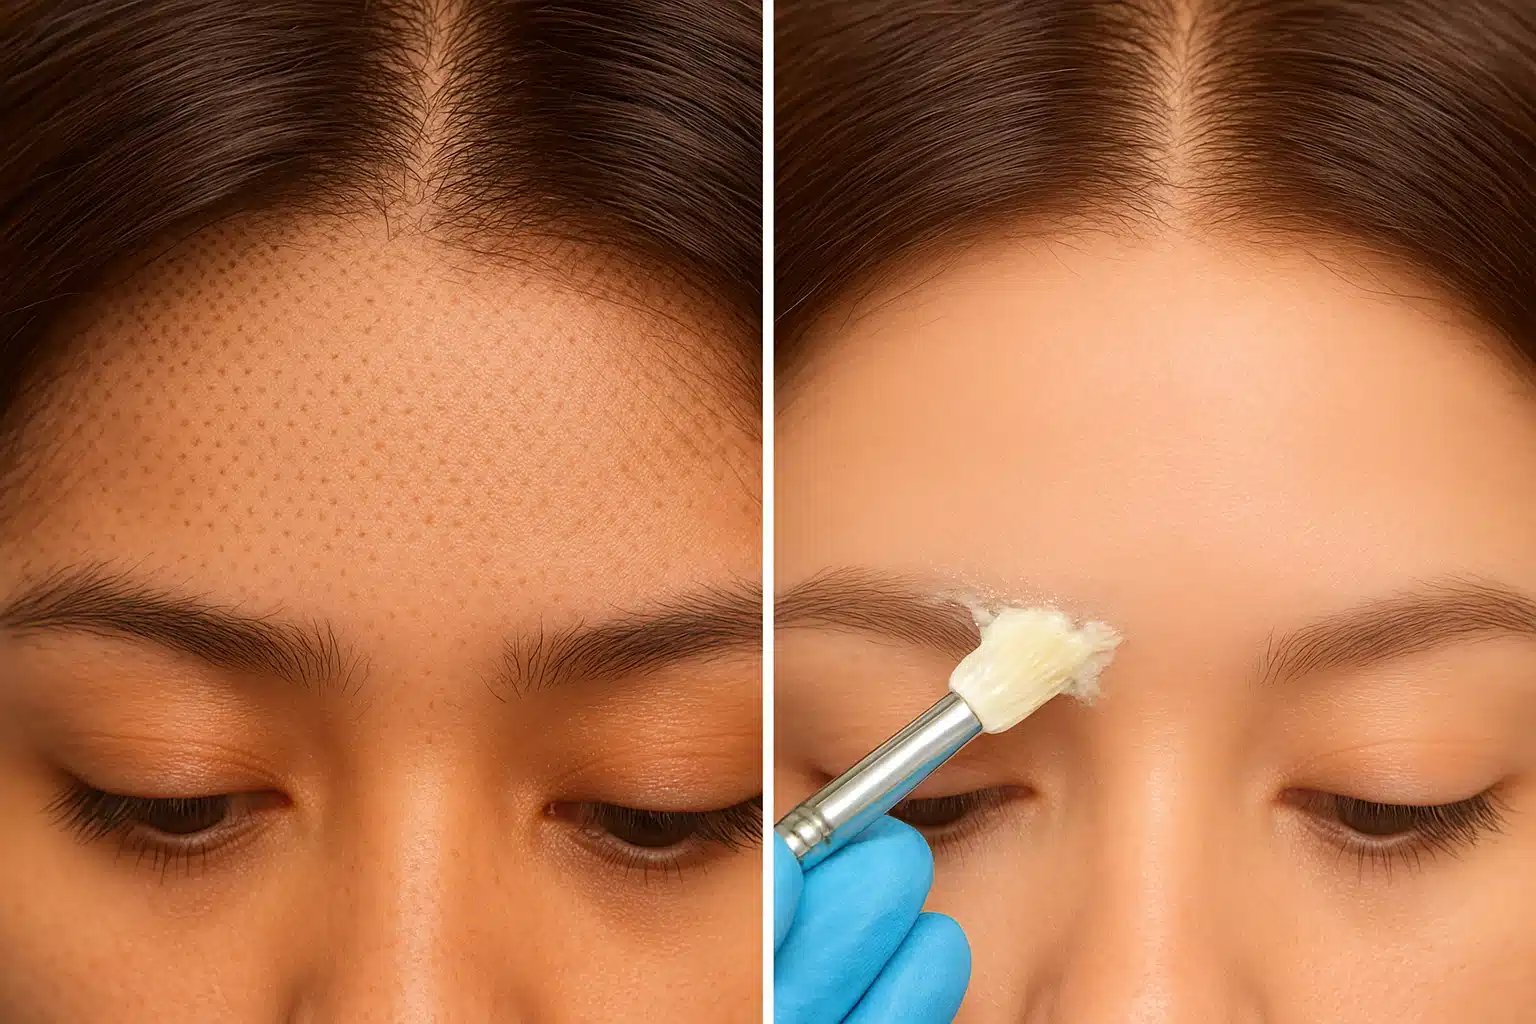
Step 2: Gentle Application
Dip your brush into the mixture and apply it to the lace. Do not press down. Imagine you are icing a very delicate cake. You want to dab the bleach onto the knots gently so that it sits on top of the lace but doesn’t push through to the hair on the other side.
- Focus Area: Concentrate on the hairline and the parting space, as these are the most visible areas.
- Feathering: Apply slightly less bleach as you move further back from the hairline to create a natural fade.
Step 3: Processing – The Most Important 20 Minutes
Once applied, cover the bleach with aluminum foil to keep it moist and retain heat, which helps the chemical process.
Timing Chart:
- 20 Volume Developer: Check after 15 minutes. Total time is usually 20-30 minutes.
- 30 Volume Developer: Check after 10 minutes. Total time is usually 15-25 minutes.
Safety Check: Do not walk away. Check the knots every 5 minutes by wiping a tiny section with the tail of your comb. You are looking for the knots to turn a pale yellow or light brown color. If they are still black, re-apply and wait.
Step 4: Rinsing and Neutralizing
When the knots have reached the desired color, rinse the lace immediately with cool water. Hold the wig upside down so the bleach runs away from the hair, not into it.
After rinsing, the knots will likely look yellow or brassy. This is normal. Apply a Purple Shampoo to the lace and let it sit for 5-10 minutes. The purple tones cancel out the yellow, leaving you with a neutral, scalp-like tone.
Phase 3: The “Mistake Gallery” & Troubleshooting
Even professionals encounter hiccups. Here is how to handle common issues without panicking. This is a vital part of learning how to make wigs look real.
Problem 1: “My knots turned bright orange!”
The Cause: The bleach was rinsed off too soon, or the hair has strong red undertones.The Fix: Don’t re-bleach immediately, as this can weaken the knots. Instead, use a blue-based toner or leave your purple shampoo on for longer (up to 15 minutes). If they are still orange, you can do a second, very gentle bleach bath a few days later using 20 Volume developer.
Problem 2: “I have ‘Hot Roots’ (Bleach bled onto the hair).”
The Cause: The mixture was too runny or you pressed too hard.The Fix: Do not cut the hair! You can fix this easily with a root touch-up spray or even mascara in the same shade as the wig hair. Carefully paint the roots back to their original color. For a permanent fix, you can use a small amount of fabric dye or hair dye on a Q-tip to darken the roots carefully.
Problem 3: “The lace is shedding.”
The Cause: Over-processing. If bleach sits too long, it eats through the knot and destroys the hair integrity.The Fix: This is difficult to reverse. Apply a knot sealer spray to the inside of the lace to lock the remaining knots in place. Be incredibly gentle when brushing and washing moving forward.
FAQ: Beginner Concerns Answered
Does bleaching damage the wig?
Bleaching is a chemical process, so it does technically degrade the hair slightly. However, when done safely (using the right developer and timing), the damage is negligible and does not affect the lifespan of the wig.
Can I bleach knots on a synthetic wig?
No. Synthetic hair is made of plastic fibers. Bleach will not lift color from plastic; it will likely melt or destroy the fiber. This guide applies only to 100% human hair wigs.
Do I need to bleach HD Lace?
HD (High Definition) lace is thinner and more transparent than Swiss lace. While the lace itself is invisible, the knots are still visible. You generally still need to bleach the knots on HD lace, but proceed with extra caution as the lace base is more fragile.
What if I’m too scared to do it myself?
That is a valid feeling! If you aren’t ready to take the plunge, there are alternatives. You can use a powder foundation that matches your skin tone to cover the grid from the inside of the cap. While less permanent than bleaching, it is a safe way to improve the look of your hairline instantly.
Next Steps in Your Journey
Bleaching knots is a skill that improves with practice. By taking the time to understand the chemistry and prioritizing the safety of the hair, you are ensuring your investment lasts longer and looks better.
Now that you understand the mechanics of the hairline, you might be wondering about the overall longevity of your piece. To continue your education, we recommend exploring our library of resources to ensure you feel confident in every aspect of wig care.


