We’ve all seen it: that moment when a wig looks so natural, you find yourself staring at the part line, wondering if it’s actually growing out of the wearer’s scalp. That magic trick isn’t usually about the quality of the hair fiber itself—it’s almost always about the lace. When a wig comes out of the box, the lace material is often a standard, transparent beige or light color. While high-quality, this “one-shade-fits-all” approach rarely matches the unique nuances of individual skin tones perfectly.
To bridge that gap, you need to understand the nuances of customization. Mastering the fundamentals of seamless wig blending & realistic hairline techniques is the secret weapon of stylists everywhere, turning a standard hairpiece into a custom creation that mimics nature. Whether you are prepping a synthetic piece or a human hair investment, the goal is the same: to make the lace disappear so only your confidence remains.
The Foundation: Why Tinting Changes Everything
Many beginners confuse “tinting” with “applying makeup.” While dabbing a little foundation on your part line is a valid quick fix, true lace tinting is a game-changer for longevity and realism.
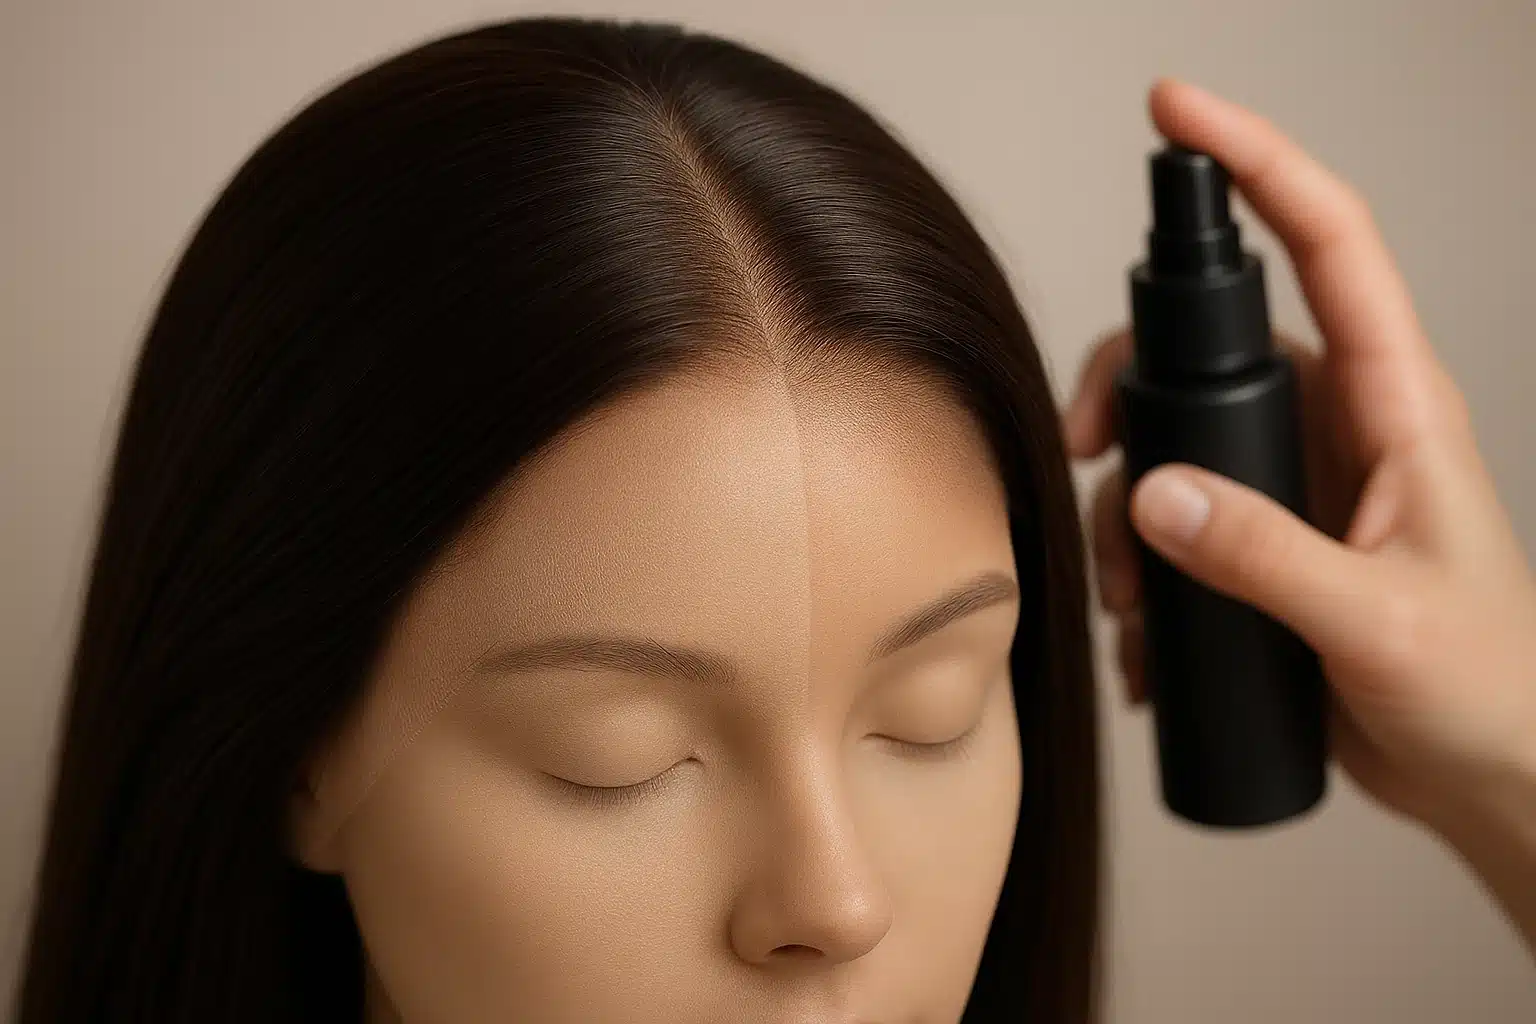
Think of your wig lace as a fine mesh screen. If you place a light-colored screen against a darker background (your skin), the grid of the screen remains visible. Tinting dyes the fabric of that screen to match the background, effectively making the grid vanish. Unlike makeup, which sits on top of the lace and can melt, transfer, or look “cakey,” lace tint penetrates the fibers of the material. This creates a semi-permanent solution that withstands sweat, humidity, and daily wear without clogging the pores on your scalp.
Prep School: Understanding Your Canvas
Before you reach for a spray or brush, you must understand two critical variables: your lace type and your true scalp tone.
Know Your Lace
Not all lace accepts color the same way.
- HD Lace: Ultra-thin and invisible. It absorbs tint very quickly, so you need a light hand.
- Swiss Lace: Durable and slightly thicker. It may require a few more layers of tint to achieve the desired depth.
- Transparent Lace: Often white or very light beige. This usually requires the most tinting work to match medium to deep skin tones.
The Undertone Equation
Here is the most common mistake beginners make: Do not match the tint to your forehead.
Your scalp is almost always lighter than your face because it gets less sun exposure. To find your true match, part your natural hair (if you have it) or look at the skin on your inner wrist.
- Cool Undertones: Veins appear blue or purple. Look for tints with “biscuit” or cool brown labels.
- Warm Undertones: Veins appear green. Look for tints with golden, caramel, or chestnut descriptors.
- Neutral Undertones: Veins look colorless or a mix. You have the most flexibility and can often mix shades.
The Methods Lab: Choosing Your Technique
There is no single “right” way to tint lace. The best method depends on your skill level, your budget, and how permanent you want the results to be.
Method 1: The Quick Melt (Lace Tint Spray)
Best for: Beginners and speed.Lace tint sprays are specifically formulated pigmented aerosols.
- How to do it: Turn the wig inside out and place it on a wig stand or foam head (covered in plastic wrap to prevent staining). Hold the spray can about 6 inches away and mist the lace in sweeping motions.
- Pro Tip: Build the color gradually. Spray a light layer, blow dry it, check the color against your skin, and repeat if necessary. It is much easier to darken lace than to lighten it.
Method 2: The Precision Pro (Mousse or Tint Stick)
Best for: Targeted application and control.If you are nervous about over-spraying and staining the hair knots, a tint mousse or stick is ideal.
- How to do it: Apply the product to a sponge or brush, then dab it directly onto the lace. This gives you total control over where the pigment goes, allowing you to define the hairline without affecting the rest of the cap.
Method 3: The Natural Route (Tea or Coffee Dyeing)
Best for: Chemical sensitivities and DIY lovers.This is an old-school method that is surprisingly effective, especially for human hair wigs.
- How to do it: Brew a strong cup of tea (for lighter/golden tones) or coffee (for darker/richer tones). Dip the lace front into the warm liquid for varying amounts of time.
- The Catch: This is a permanent stain and can be unpredictable. Always test a small scrap of lace (perhaps the extra lace you plan to trim off) before dipping the whole wig.
The Emergency Room: Troubleshooting Common Mistakes
Even seasoned wig wearers make mistakes. Here is how to handle the most common tinting disasters without ruining your unit.
“Help! It’s too dark.”
If you got heavy-handed with the spray, don’t panic. If the tint is still wet, blot it immediately with a damp paper towel. If it has dried, you can gently wash the lace with a clarifying shampoo and warm water. For stubborn tints, dabbing the lace with a cotton ball soaked in rubbing alcohol can lift some of the pigment.
“It looks orange or brassy.”
This usually happens when a warm-toned tint is applied to a cool-toned scalp. To fix this, you need color theory. You can counteract the orange by applying a light wash of purple shampoo (for human hair wigs) or using a “cool” toned makeup powder over the dried tint to neutralize the warmth.
“The lace grid is still visible.”
This often means the tint didn’t adhere to the lace evenly, or the knots (where the hair is tied to the lace) are still black. While tinting colors the mesh, it doesn’t lighten the dark knots. You may need to look into “bleaching knots”—a separate chemical process—or use a precision concealer pen on the inside of the cap to mask the dark dots.
Masterclass: Pro Tips for a Flawless Finish
To take your wig from “wearable” to “undetectable,” consider these final touches:
- Seal the Deal: After your tint is dry, spray a light layer of holding spray (hairspray) over the lace. This seals the pigment and prevents it from transferring onto your forehead throughout the day.
- Cut After, Not Before: It is generally easier to tint the lace before you trim the excess lace off. The extra material gives you something to hold onto without touching the wet pigment.
- Clean the Hairline: If you accidentally got tint on the hair fibers around the face, use a mascara wand dipped in water or a little alcohol to wipe the hair strands clean. Clean hair against tinted lace creates the sharpest contrast and most realistic look.
For more insights on maintaining the quality of your piece after customization, you might find our resources on [] helpful for keeping that hair looking fresh.
Frequently Asked Questions
Q: How long does lace tint last?
A: Dedicated lace tint sprays and mousses are semi-permanent. They will typically last through 3 to 5 washes. If you wash your wig weekly, you may need to touch up the tint once a month.
Q: Can I tint synthetic wigs?
A: Absolutely. In fact, tinting is one of the best ways to elevate a synthetic wig. Just ensure you are using a tint that doesn’t require heat setting, as high heat can damage synthetic fibers.
Q: Will the tint stain my skin?
A: Once the tint is fully dry, it should not transfer to your skin. However, if you sweat heavily, there is a slight chance of transfer. Using a skin barrier spray or a wig grip can help prevent this.
Q: Can I just use fabric dye?
A: It is not recommended. Standard fabric dyes often contain harsh chemicals that can irritate the sensitive skin on your forehead and scalp. Stick to products specifically formulated for wig lace or skin-safe DIY methods like tea.
Creating the perfect scalp illusion is a journey, not a race. Don’t be afraid to experiment with different methods on older wigs before tackling your new favorite style. With a little patience and the right shade, you’ll achieve a look so seamless, even you might forget you’re wearing a wig.


