Have you ever experienced that specific moment of confusion when you try on a wig that is “supposed” to look great on you, yet something feels slightly off? You’ve done the research, identified your face shape, and selected a cut recommended by experts, but the reflection in the mirror doesn’t quite match the vision in your head. It’s a disheartening experience that many new wig wearers face, but here is the good news: the problem likely isn’t the wig, nor is it your face. The missing piece of the puzzle is usually volume placement.
Most advice focuses strictly on the cut of the hair—like recommending a bob for a long face or layers for a square face. While this is a good starting point, the silhouette is actually determined by where the hair puffs out and where it lays flat. Finding the right hairstyle for your face shape is crucial for a flattering look, and our Wig Styling for Your Face Shape: The Definitive Guide breaks down exactly how to achieve it. However, to truly master your look, you need to understand that volume is an optical illusion. By strategically adding height or width, you can visually reshape your facial proportions, turning a “near miss” style into a perfect fit.
The First Principles of Facial Balance
Before grabbing a comb or styling spray, it is helpful to understand the “why” behind volume. Think of volume as a tool for directing the human eye. Where you place the bulk of the hair is where the eye will be drawn, and it influences how the brain perceives the shape of your face.
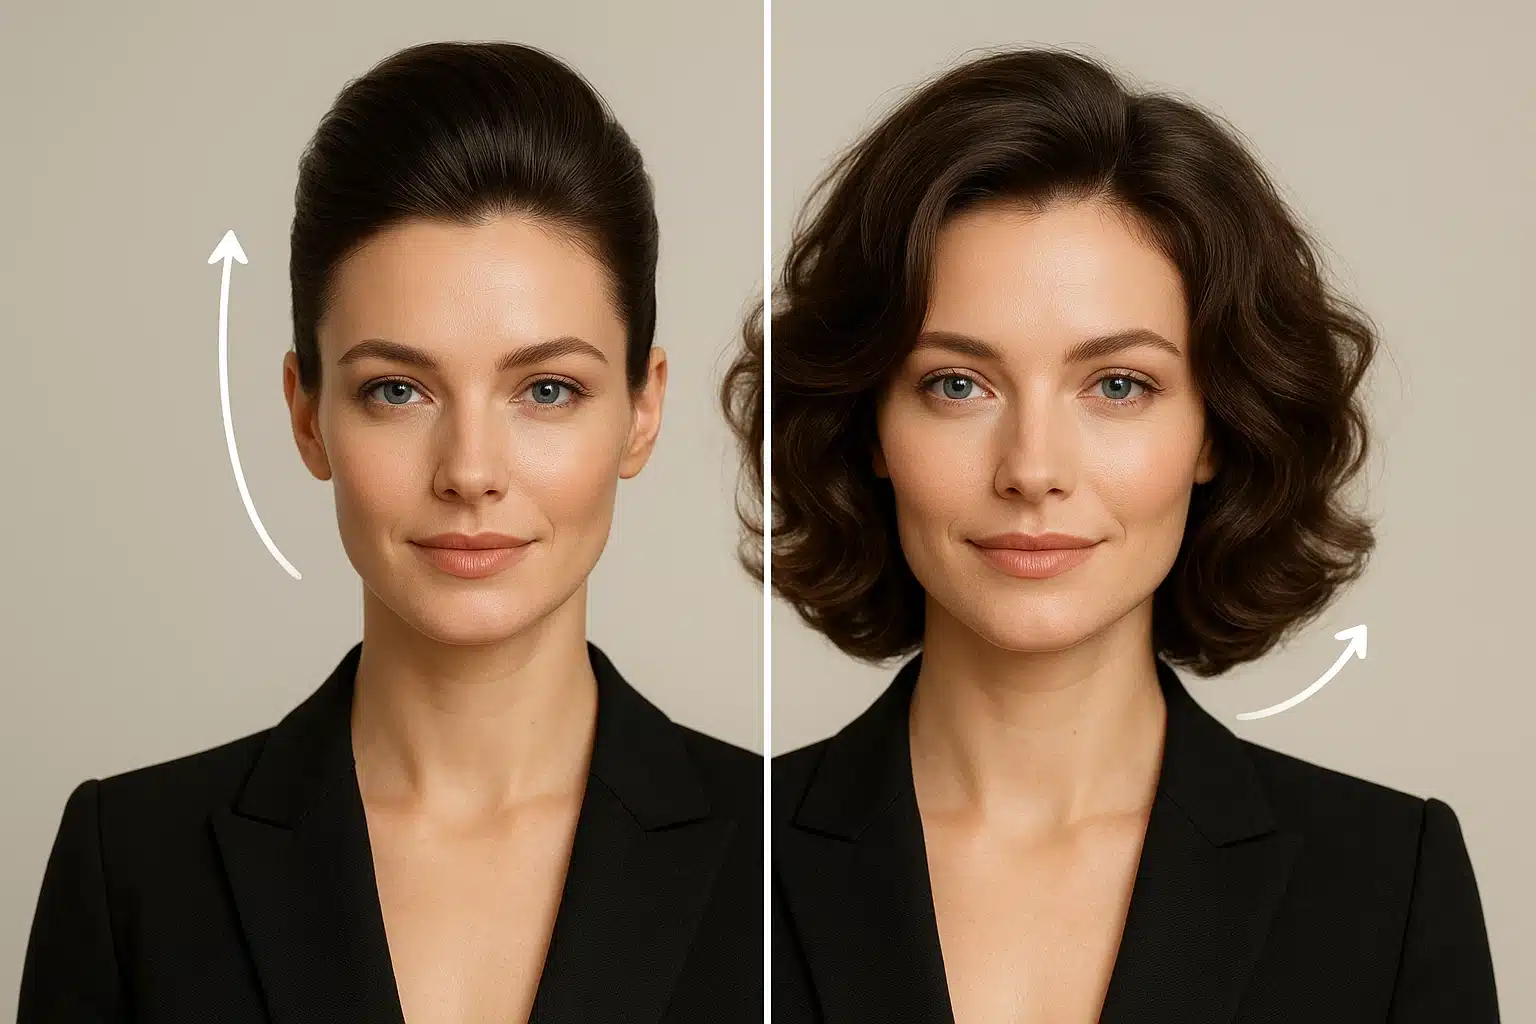
There is a simple Golden Rule for wig styling: Add volume where your face is narrow, and reduce volume where your face is widest.
- To Create Length: If you want to make a round or square face appear longer and leaner, you need to draw the eye upward. This is achieved by keeping the sides sleek and adding height at the crown.
- To Create Width: If you have a long or oblong face and want to make it appear fuller, you need to draw the eye outward. This means keeping the crown relatively flat and adding volume at the sides, specifically around the cheekbones or jawline.
Understanding this concept moves you from simply wearing a wig to truly styling it. You aren’t stuck with the density the wig came with out of the box; you have the power to manipulate it.
Your Volume Styling Toolkit
You don’t need to be a professional stylist to alter the silhouette of your wig. You just need a few basic techniques to push and pull the volume where you need it.
Techniques to Add Volume (The “Up and Out” Method)
When you need to create height at the crown or width at the sides, try these methods:
- The Shake-Out: Never judge a wig straight out of the box. Turn it upside down and give it a gentle but firm shake. This loosens the fibers and wakes up the “permatease” (short, crimped fibers at the root designed to create lift).
- Backcombing (Teasing): Using a wide-tooth comb or a wig brush, take small sections of hair and gently brush backwards toward the root. This stacks the fibers to create a cushion of volume.
- Zig-Zag Parting: A straight part can sometimes look flat and severe. Using a rat-tail comb to create a jagged or zig-zag part instantly lifts the roots and adds diffuse volume to the top of the wig.
Techniques to Reduce Volume (The “Sleek and Down” Method)
Sometimes a wig feels too “poofy” or “helmet-like.” Here is how to slim it down:
- The Heat of Your Hands: For synthetic wigs, the heat from your hands is a powerful tool. Rub your palms together to create warmth, then press and hold them flat against the areas where you want to reduce volume (like the sides). The subtle heat helps train the fibers to lay closer to the cap.
- Steam (For Heat-Friendly Synthetics): A careful application of steam can flatten bulky areas. Direct the steam at the roots while combing the hair flat. Note: Always check your wig’s heat tolerance before applying steam.
- Thinning Shears: If the density is truly too high, thinning shears can remove bulk without changing the length. This is an advanced technique, so if you are unsure, we recommend taking your piece to a wig specialist.
Mastery: The Face Shape Styling Blueprints
Now that you have the tools, let’s apply them to specific face shapes.
The Round Face Strategy: Vertical Elongation
The Goal: Your aim is to visually lengthen the face to create a more oval appearance.The Strategy:
- Add Volume: Focus on the crown (the top back part of the head). Use backcombing to create a subtle “bump” or lift here. This draws the eye up, effectively adding inches to your facial height.
- Reduce Volume: Keep the hair at the sides of your face (around the ears and cheeks) as flat and sleek as possible. Volume here will only make the face look wider.
- The “Aha” Moment: Think of this silhouette as a vertical rectangle. You want narrow sides and a tall top.
The Long / Oblong Face Strategy: Horizontal Expansion
The Goal: You want to break up the vertical length and add softness and width.The Strategy:
- Add Volume: Focus on the sides. Waves, curls, or teased layers that hit at the cheekbones or jawline are your best friends. This draws the eye horizontally, making the face appear fuller.
- Reduce Volume: Avoid high crowns or “poofs” on top. Keep the top of the wig relatively flat to avoid elongating the face further.
- The “Aha” Moment: Think of this silhouette as a triangle or an oval. You are building width at the bottom to balance the length.
The Heart / Triangular Face Strategy: Balancing the Extremes
The Goal: Heart shapes have wide foreheads and narrow chins; triangular (pear) shapes have narrow foreheads and wide jawlines. You want to add volume to the opposite of your widest point.The Strategy:
- For Heart Shapes: Keep the crown and temples smooth. Add volume at the chin level using textured waves or a bob that flares out slightly. This fills in the space where the face narrows.
- For Triangular Shapes: Add volume at the temples and crown to balance the wider jawline. Keep the hair around the jawline sleek to avoid adding bulk to the widest part of your face.
Common Pitfalls to Avoid
As you experiment with volume, keep these common mistakes in mind:
- The Uniform “Helmet”: The most common error is adding volume everywhere at once. If you tease the top and fluff the sides, you lose the contouring effect and end up with a shape that looks unnatural. Remember: volume relies on contrast. You need flat areas to make the voluminous areas pop.
- Over-Thinning: When a wig feels too heavy, the instinct is often to cut the hair out. However, sometimes the issue isn’t the amount of hair, but the texture. Try flattening the sides with steam or heat first. Once you cut the fiber, you cannot put it back.
- Ignoring the Nape: If you have short hair underneath, make sure the wig’s volume at the nape (back of the neck) isn’t projecting out too far, which can distort the silhouette of your head.
Frequently Asked Questions
Q: My wig looks “boxy” on top. How do I fix this?
A: This is common with new wigs. It usually happens because of the “cold set” from the box. Try the “hand heat” method: rub your hands together and press firmly on the “corners” of the wig where it looks boxy. If it is heat-friendly, a quick blast of warm air from a dryer (directed downwards) while holding the hair flat can also reshape it.
Q: Can I add volume to a naturally straight, sleek wig?
A: Yes! You don’t need curls to have volume. You can use a dry shampoo or specific wig styling spray at the roots. Lift a section of hair, spray the root, and let it dry while holding it up. This creates “root lift” without changing the texture of the hair.
Q: What is “Permatease” and should I try to remove it?
A: Permatease is short, crimped hair at the root of many synthetic wigs. It is intentionally placed there to provide permanent volume and hide the wig cap. Do not try to comb it out or remove it—it is the structural foundation of your wig’s volume! Instead, learn to smooth the longer hair over it to get the height you want.
Q: I have a very small face. Will a high-volume wig overwhelm me?
A: It can. If you have petite features, you generally want to avoid “big hair” that widens the head significantly. Stick to styles with lower density, or focus on vertical volume (height) rather than horizontal volume (width) to keep your features from getting lost.
Next Steps in Your Styling Journey
Understanding volume placement is a superpower in the world of wigs. It liberates you from being stuck with a style exactly as it comes out of the box. The next time you put on your wig, take a moment to look in the mirror and ask: “Where is my eye drawn?”
If you want to lengthen your face, smooth the sides and fluff the crown. If you want to widen it, do the opposite. Play with the hair, use your hands, and don’t be afraid to experiment. With these techniques, you are no longer just wearing a wig; you are customizing a look that is uniquely, beautifully yours.


